I made a dish for dinner the other night, and as I often do, I did it without using a recipe. My husband liked it so much he asked me if I remembered the recipe. My answer was yes, but that’s not to say that I will always remember or be able to recall the recipe. I thought I would write here so I will know where to find it.
My goal was to use up a chicken breast that was leftover from the previous nights dinner. I also thought I wanted to make a Mexican style dish.
So in a 2 quart casserole dish I layered the following:
1 can refried beans
1 can whole kernel corn
1 cup cooked white rice
1 can chopped green chili peppers
1 cooked and cubed chicken breast
I then poured 1 can of green chili enchilada sauce over it
I topped it with a mix of shredded cheddar and shredded Colby jack cheese
I put it in the oven and baked at 300 until it was warmed through probably about a half hour. I severed it with tortilla chips. I spiced mine up by adding salsa and my husband enjoyed his with parmesan cheese sprinkled on top.
This simple recipe made a nice dinner and was easily reheated for lunch the next day as well.
We have several neighbors and family members who, like us, have a great appreciation for farm fresh, free range eggs. A couple weeks back, the hens started laying more so my husband put the word out to some neighbors that we had some eggs for available. Immediately we had requests for more eggs than we had on hand. At that point we decided that we should add some laying hens to our flock this year.
I wanted to get an early start with the chicks, so when we found last week that the local farm store had chicks we decided it was time to get ready. Over the weekend my husband brought the brooder (stock tank) inside and took the chick water and feed dishes out of storage. Tuesday morning, before we went to the farm store, he brought out the heat lamp and put wood chips in the brooder for bedding.
Scout and Trooper Welcoming Our New Arrivals
Scout and Trooper have been through this with us a couple times before, and Scout especially loves baby chicks. We have taught him that those are “his babies”. When we got home from the farm store the boys were eager to see the chicks.
You might think it is risky letting the dogs get so close to the chicks, and yes to some degree it is, but the boys have learned that they have to “be nice” to their “babies”. Sometimes the chicks get nosed around a little or even get doggie (tongue) bath, but we have yet to lose a chick because of the boys.
Scout Welcoming Our New Chicks
We planned on getting more Silver Laced Wyandotte’s and we compromised on getting nine pullets. When we got to the farm store we discovered that the Wyandotte’s both silver and gold laced were completely sold out. So we decided to get Buff Orpingtons.
Although Buff Orpingtons were not our first choice they really are a nice breed. Of our adult chickens I think they are the friendliest, they lay consistently large or extra large eggs, and of the three breeds we have (including Rhode Island Red and Silver Laced Wyandotte) the Buffs are the only ones that have gone broody and raised chicks. They do make good mothers. I am not sorry we got the buffs.
Brooding Buff Orpington Chicks
Chicks In Their Brooder
For the first couple weeks or at least until they get their feathers, their brooder will be indoors and Scout and Trooper will come running whenever we tend to the chicks. We put a step stool next to the brooder so Scout can put his feet up and look over the side. Trooper is tall enough to just look over the side.
After they get all of their feathers and the weather is good enough we will move them to a hutch on the deck where they can still have the heat lamp for warmth, but they will have more space.
The Chicks Have A Play House
It didn’t surprise me, on day two of having the chicks here, when my husband took this empty “Silk” carton and made them a play house. In fact I’m more surprised that he hasn’t made them a jungle gym with a tire swing and a seesaw… Yet. He’s such a good chicken daddy.
As for me I am enjoying hearing “peep peep peep” and “peck peck peck”. It makes me think spring 🙂
We have decided to postpone my Friday evening presentation at Essential Health in Memphis. I will post an update when this presentation is rescheduled.
The warm temperatures on Friday and Saturday were great for sap flow, so by the end of the day Saturday my husband had collected approximately 10 gallons or 40 quarts of sap. While collecting the sap from the sap buckets into plastic 5 gallon pails he filtered the sap through a honey filter that sits in the top of the 5 gallon bucket. This removed any solids that found their way into the sap. Overnight temperatures were cool enough to store the sap outside without it spoiling.
Yesterday morning he set out for the farm with the equipment he needed for cooking the sap. I didn’t get pictures of this part of the process yet, but hopefully I will as we collect and cook more sap. For equipment he took a 30 quart stainless steel pot for cooking the syrup and a long handle stainless steel spoon for stirring. He also took a second pot that the hot syrup would be transferred to in order to bring it home. He packed a lunch for himself and some treats for Scout and Trooper.
Since we don’t have a sugar shack or sap house for processing the sap indoors, it was a blessing that the weather was favorable for keeping an outdoor fire going. In preparation for this my husband had constructed a special fire pit, in a high and dry location, and split several wheel barrels full of fire wood. He began his syrup making mission by getting the fire going around 10 A.M. with a goal of having some finished product by days end. Keeping the fire burning and the pot boiling were his main objectives. He first thought that boiling small amounts at a time (filling the pot 1/4 full) would speed up the process, but he quickly learned that each time he would add more cold sap the temperature would drop so dramatically that it would take 10-12 minutes to return to a boil. Realizing the whole pot was hot, he decided to fill he pot closer to the top and maintain the boil while adding only smaller amounts of sap as it boiled down. He said it took about two hours before it came to a rolling boil.
In mid afternoon he made a quick trip back to the house to bring Scout and Trooper (who apparently just wanted to lay in the van) and to grab some hot dogs that he could cook over the fire for dinner. At this point he was anticipating that it could be as late as 8 P.M. before he was done cooking down the sap.
Reality was that around 6 P.M., a long eight hours after he began, and just in time for the chickens to be closed in their coop for the night, the sap had boiled down enough that the rest of the process could be done in the kitchen.
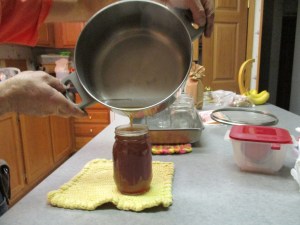
When he returned home we poured the cooked-down sap into a much smaller pan.
Well On It’s Way To Becoming Syrup
We heated it for a few minutes before deciding this would be a good time to filter it. We had decided to use a juice (or jelly) bag, that I had on hand for filtering the “sand”(a byproduct of boiling sap) out of the syrup. This seemed to work well. We then returned the sap to a boil and watched closely as it continued to boil down. My husband also told me to take some bacon out of the freezer to cook with tomorrows waffles for breakfast.
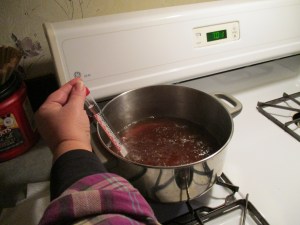
Once it seemed to be thickening I put in a candy thermometer. It needed to be brought up to 219 degrees fahrenheit or 7 degrees above the boiling point of water.
Watching The Temperature Closely
While I watched the thermometer, my husband used a spatula dipped in the syrup to check for sheeting – the syrup forms a sheet on the spatula instead of running off in droplets.
Woo Hoo! It’s Syrup!
When the syrup was sheeting on the spatula and the temperature reached 219 degrees, which happened about the same time, we poured the syrup into sterilized ball jars.
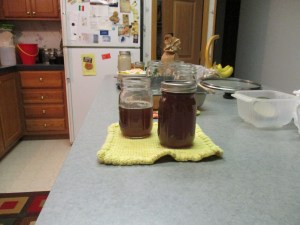
A Little More Than 1 1/2 Pints of Syrup
Of course we had been tasting our product along the way, and I can honestly say that, while I don’t have a long history of tasting pure maple syrup, this is the best maple syrup that I have ever tasted.
This mornings breakfast menu included bacon and blueberry waffles, (with frozen blueberries from last springs harvest and our farm fresh egg), and of course our own maple syrup. Yumm!
While we don’t call it a bucket list, making maple syrup has certainly been on our to-do list for quite a long time and we are thrilled that we have done it. 🙂
Since the weather has cooled again the sap is not flowing, this weird weather pattern has only left us wondering when the next sap will flow and how much syrup we might end up with this year. But in the mean time we have realized why real maple syrup costs so much.
We have been using a lot of maple syrup lately. It’s delicious on our French toast or waffles that we have been having for breakfast several times a week, but have you shopped for maple syrup lately? I’m talking about real maple syrup not, the corn syrup that is flavored up to taste like maple syrup. It’s expensive. So much so that we have recently opted for the fake stuff in effort to keep our grocery bill down. Real maple syrup has truly become a delicacy. A quick check at the Walmart website showed me prices ranging from 54 cents up to 94 cents per ounce. 54 cents might not seem like much but you don’t buy just one ounce. 12 ounces at 54 cents is $6.48, a quart which is 32 ounces at 54 cents would be $17.28, and a gallon which equals 128 ounces at 54 cents per ounce comes to $69.12. Keep in mind those are the low end prices; at 94 cents an ounce a gallon would cost over $120.
So considering this, and that fact that we have had the equipment needed for tapping the trees and collecting the sap, stored in our shed for the past few years, tapping some maple trees was a no-brainer.
We have been watching the weather forecast for about the last two weeks, since sap flow is dependent on the weather. Basically sap flows from trees that are still dormant when temperatures rise above freezing during the day but fall back below freezing at night. For a thorough explanation click here http://maple.dnr.cornell.edu/produc/sapflow.htm Since todays temperature was forecasted to be in the high 40’s or low 50’s and daytime temperatures for the next week to be mostly above freezing, it seemed like a good day to get the trees tapped.
After breakfast, we started out by tapping some sugar maples.
Tapping A Sugar Maple
We used manual drill, and when I did the tapping of one of the trees I was surprised at how easy it was to drill the hole. A few things to note about drilling are that it should be done at a slight upward angle and drilled no more than 2 inches into the tree. I’m not sure if you can see in the picture that the drill bit had a piece of tape on it to mark the 2 inch mark. Recommended height is a height that is comfortable, so reaching up or bending down is not necessary. Also the ideal spot is one that has not been previously tapped and has no visible scars.
Spile In Place
After drilling the hole the spile is tapped into the hole. Again I was somewhat surprised at how easy it was. It only took a few gentle taps with a light hammer and the spile was securely in place.
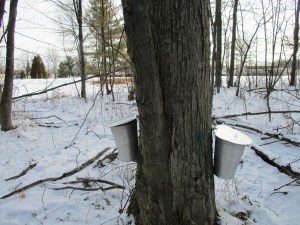
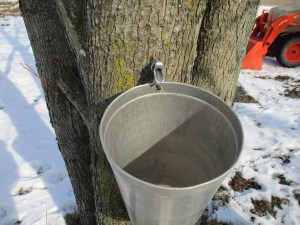
Sap Bucket Hanging From Spile
The next step was to hang the sap bucket. The bucket has a small hole in it, and the spile has a hook below the spout that is designed to hold the bucket. When the bucket is hung from the hook the spout then reaches over the top edge of the bucket. When the sap flows from the tree it runs down the spout and into the bucket.
Sap Bucket With Lid
The final step in the tapping process is to install the lid. Fortunately we had figured out how to assemble these a few days prior to doing the tapping, as it was a bit of a puzzle. The back edge of the lid is folded over but cut out in the center. There is a very thin metal rod that gets inserted through the first half of the fold. It then goes through two holes that were drilled into the top of the spile, then lastly through the second half of the fold on the lid. At this point the lid is secured to the spile, and it only rests on the lip of the bucket. The lid sits on an angle and has quite a bit of overhang, so it does serve to keep rain, potential snowfall, and anything else falling from above, out of the bucket. It does not sit tight on the bucket, so there is still a chance that things such as bugs or anything coming at it from the proper angle might get in. Those things can be filtered out later. This design allows for the bucket to be removed from the spile, for empting, without having the lid in the way. A very clever design.
Some Trees Can Have More Than One Tap
http://maple.dnr.cornell.edu/FAQ.htm gives this information to determine how many taps a tree can support. “How many taps should you have on a maple tree? A healthy tree 10-17 inches in diameter (31-53 inch circumference) should have no more than one tap. A tree 18-24 inches in diameter (57-75 inch circumference) should have no more than two taps. A tree larger than 25 inches in diameter (79-inch circumference) should have no more than three taps.”
Tapping A Sugar Maple
We put half of our 18 buckets on sugar maples, but we also wanted to tap our silver maples at the farm. While silver maples indeed produce sap, it is said that they are not idea because the sugar content is lower than that of the sugar maple, thus requiring more sap to make the syrup. They also bud out earlier, therefore they have a shorter sap flow season.
Silver Maple
The first thing we noticed when tapping the silver maples was that the sap began to flow immediately when the tree was drilled. Because it is clear it doesn’t show up in this picture, but there is sap coming out.
Tapped Silver Maple
Unlike sugar maples that have a single large trunk growing straight up, the silver maple tends to have many trunks growing from near ground level. They grow outward on an angle. Because of this the buckets do not hang very straight. They will need to be emptied more often to prevent the sap from spilling over the side.
Upon seeing the sap run from the tree my husband tasted it. This was no surprise to me since he has a long history of tasting sap. As a kid he worked for a neighborhood maple syrup operation, and ever since I’ve know him, whenever he sees sap coming out of cut wood, even if it’s burning in the fire place, he dips his finger in the sap and tastes it. When he tasted the sap from the silver maple he responded with “it’s sweet, it has good sugar content.” I then tasted then sap and learned that my palate is not as refined as his. To me it tasted like water with just the slightest hint of sweetness. This makes sense to me because the sugar content of the sap from and sugar maple is reported only to be between 2 and 3% and the sugar content of the silver maple sap is between 1.5 and 1.75%.
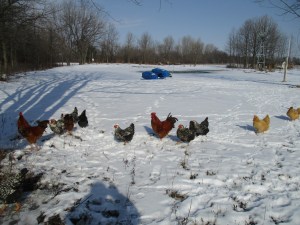
Curious Creatures
As with most things we do at the farm the chickens had to investigate. (and who doesn’t love a good chicken picture)
Tapping the trees is only the beginning, and I might add the easy part, of making syrup. With that statement I must correct the comments made on my earlier post. https://donteatitsoap.com/2016/02/17/can-you-guess-what-we-are-doing/ Erin’s comment was, “Dad says gathering maple syrup” and I replied “Dad is correct”. What I should have said is that dad has the gist of what we are doing, but technically (and I’m sure Dad knows this) you don’t simply gather maple syrup from a tree. The sap buckets will be checked at least twice a day, and the sap that is collected in the buckets will only become syrup after a long boiling process. It will take 40-50 gallons of sap to boil down into one gallon of syrup. So as we continue to collect sap and make syrup I will post updates on our progress. I hope you will check back to see how it goes.