Monthly Archives: June 2016

Strawberries At Last!

It’s been my dream for more than a decade to grow a nice strawberry patch, ever since the first year I made homemade strawberry jam and my family loved it so much that store bought strawberry jam was no-longer welcome in our home. Since growing our own berries would lower the cost involved in making homemade jam, we decided to put in a strawberry patch. We started with a few plants in a raised bed, and over the next several years made several strawberry beds in our yard. We never yielded more than a few handfuls of small berries, so every June, when the strawberries were ripe, I would go to one of our local strawberry farms and buy at least 2 (10 quart) flats of fresh, Michigan grown strawberries and make most of them into jam.

When we bought the farm in 2011, having a nice strawberry patch was still one of my dreams. After we got the garden area worked up, where I would plant perennial plants, I moved some of my strawberry plants from the house to the farm. We planted, mulched and watered the plants and watched them take root, but within a few weeks tragedy struck. The deer discovered our strawberry patch. The plants were being eaten and some even dug up. It wasn’t long before the strawberry patch was completely annihilated. I have to admit that I was, and still am, baffled by the fact that wild strawberries grow all over the farm and go completely untouched by the deer, yet the strawberry plants we put in were devoured.

Since fencing is our best option to protect our food against deer, in the fall of 2014 the area, known as garden number 2, was fenced in. The following spring we planted strawberry crowns. I think we put in about 30 of them. Since the deer were now denied access to the area the plants were able to develop and grow. Being their first year we saw only a few blossoms that developed into small berries before the plants began making runners. We left all the runners in tact and our two rows of strawberries became one big strawberry patch.

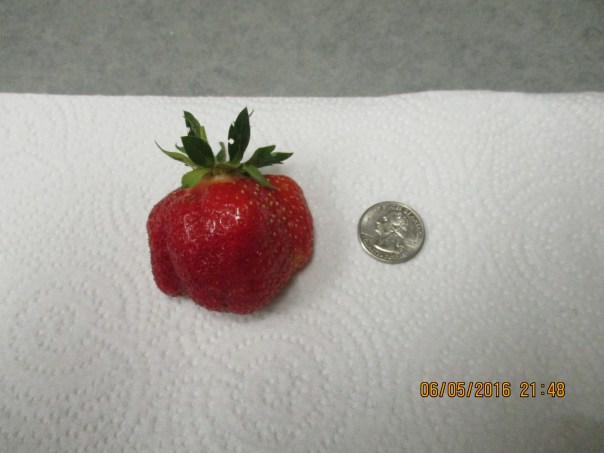
This spring the plants were quick to green up and they had loads of blossoms. We picked our first, and probably our biggest, berry on June 5th. It was big, beautiful and oh so sweet.

IMG_1347
Our first strawberry compared to a quarter

A few days later we picked about two quarts, and then the daily picking became a two person job. For about a week and a half we picked daily with each picking yielding between 4 and 10 quarts.

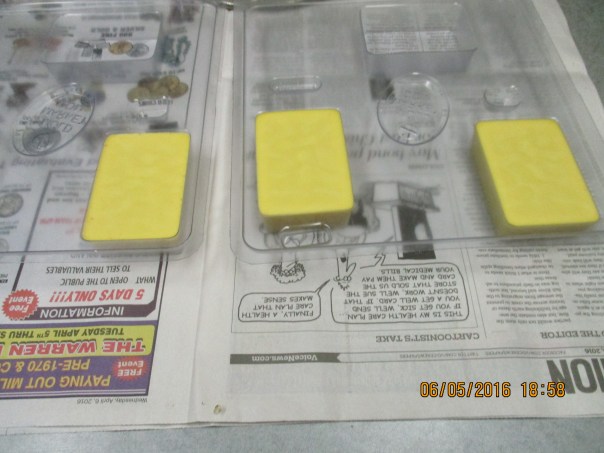
Since I didn’t have time to make jam I decided to freeze the berries. After washing and cutting the stems I let them dry on a paper towel.I then put them on trays in the freezer to freeze them individually before putting them in quart size freezer bags.

I made strawberry shortcake for dessert. The strawberries were so good they did not need added sugar, but the shortcake was horrible so I won’t share the recipe.

After I had about 30+ quarts in the freezer my husband suggested dehydrating some. It took about 4 quarts to fill up my nine tray dehydrator.

IMG_1394

It took less than 24 hours to dehydrate them.

IMG_1395

The nearly 4 quarts turned into less than a quart when dried. These sweet little strawberry chips are delicious on their own, but they can be added to my morning oatmeal, cooked into pancakes, muffins or sweet breads, added to yogurt, or mixed into a trail mix.

IMG_1424Since the berries were still coming I decided to make my jam. I made 20 pints of strawberry jam.

The following day I called two of my sisters who I knew were planning on making jam as well. For about the next 5 days they took turns getting the berries we picked the night before. I think they each ended up with between 12 and 15 quarts of berries.

One of my sisters sent me a recipe for strawberry lemonade concentrate that she had made and really liked, so yesterday, when the weather had cooled, I canned 7 1/2 quarts of it. Here is the link for the recipe.  http://www.sbcanning.com/2012/04/strawberries-and-summer-strawberry.html?m=1 

We are so thrilled and thankful for a bountiful strawberry harvest this year.

Coincidently, or not, the day after we did our last large strawberry picking we picked our first ripe blueberry.


Garlic Scapes

IMG_1393

What are garlic scapes???

They are the seed heads produced by hardneck garlic varieties. They appear in the spring, and if left to grow they will flower and produce dozens of tiny garlic bubils (seeds). Most growers cut the scape off the garlic plant in order to allow the garlic to put more energy into growing a bigger bulb. If cut early the scapes are tender and delicious. They are said to have the same nutritional value as garlic bulbs, and although they possess a milder flavor when cooked, they are a culinary delight. They are great roasted, grilled, stir fried or used raw in dips, salads and pesto. To discover great garlic scape recipes simply do an internet search for garlic scape recipes. They are only available for a short time in the spring but can be preserved by freezing or pickling.

IMG_1426

I will be selling garlic scapes at the Memphis farmers market tomorrow morning, in Memphis, Michigan, from 9 a.m. until 1 p.m. or if you are interested in purchasing garlic scapes send me an email at ruth20012001@yahoo.com put “garlic” in the subject line.

Filtering Bees Wax

IMG_1313
Honey Comb Inside A Warre’ Top Bar Bee Hive.

To clean the bees wax that we harvest with the honey from our hives I have seen and read about several methods. I first tried what I thought would be the easiest, which involved boiling the wax in water, allowing it to cool and then scraping all of the non-wax particles off the bottom of the hardened wax, it was exactly the way I would render lard or tallow. I was not happy with the results of this method for cleaning wax. I found that scraping the particles off the hardened wax was difficult, and it took several times repeating the whole process to get the wax as clean as I wanted it. The wax also lost it’s sweet bees wax fragrance.

I next decided to try one of the filtering method that I read about. I will start by saying that all of the pans and utensils that I use when working with wax are dedicated to working with wax. Once it is there the wax is extremely difficult if not impossible to wash off.

IMG_1331

I always start by rinsing the wax. Today my husband did this for me. The wax was in a five gallon bucket that has small holes drilled in the bottom. He took it outside and ran water from the garden hose though it until it seemed like most of the honey was rinsed out. I then just let it drip for a while.

There are two important things I will point out about rinsing the wax. The first one is never rinse the wax in the house. Beeswax is a very hard substance, its melting point is about 147 degrees Fahrenheit. A drain clogged with beeswax could be a very expensive fix.  The second is that once the wax is rinsed and drained as much as possible, it should be cleaned or filtered right away. If it is not possible to filter it within a few hours, I freeze the wax. The reason for this is that the wet wax will grow mold. Unfortunately, I learned this the hard way last year and ended up throwing away quite a bit of wax.

IMG_1329

To melt the beeswax I use a double boiler or two old pans that stack together (again they are only used for this purpose). I put water in the bottom pan and the wax in the top pan. I heat the water and let it boil the water until the wax is melted.

IMG_1338When the wax is completely melted the non-wax particles can be filtered out. To do this I use a strainer lined with several layers of cheese cloth.

The strainer fits nicely into this old ceramic crockpot insert that I picked up cheaply at a Salvation Army thrift store. I pour the wax through the cheese cloth into the ceramic pot and then pour the filtered wax into some of my soap molds.

IMG_1340

As the wax hardens it looks like this.

IMG_1341

When it is taken out of the mold it looks like this. Some of the bars may still have some dark spots in the and will go through one more cycle of melt and filter.


IMG_1342

While I always use news paper on the counter, when working with wax, I have learned that the finished bars should not be placed directly on the newspaper because the ink will transfer from the paper to the wax.

I have read that one pound of beeswax holds 22 pounds of honey. These numbers are very close to the amounts of honey that we harvested and the wax that I filtered. Most of this wax will be used to make my balms and some may be used to make candles.

Not to have any of this valuable wax go to waste, we have begun using the cheese cloth, that is now coated with a wax film, as fire starter in the fire place. It works wonderfully.

Our Off Grid Irrigation System

Since the farm does not have electricity hooked up, watering the gardens is not as easy as hooking up a hose and turning on a sprinkler.  One of the reasons we put in the pond four years ago was to have the ability to use it for watering.

IMG_0038

Our pond was dug according to the township requirements. I don’t remember the exact slope ratio but it has a gradual slope for the first 30 feet all the way around the edge. We gave it less of a slope at the beach area because we anticipate grandbabies playing in the water. After the first 30 feet it becomes a deep hole dropping down to 20+ feet. The clay bottom helps to retain water. So there is not much likelihood of it drying up.

IMG_1236

In the spring of the following year we put up the windmill. Like the pond the windmill has more than one purpose. It aerates the pond through a hose connected on one end to the windmill and on the other end to an airstone diffuser that sits on the bottom of the pond. The windmill adds life-giving oxygen to the pond. The windmill is located on the bank of the pond. It is somewhat central to our various garden locations. It’s second function is to pump water out of the pond for irrigation purposes.

IMG_1233

We purchased this pump, from the same company that we bought the windmill from, in order to pump water out of the pond. While I can’t explain the mechanics of the pump, I know that one hose connects from the windmill to the pump. It pumps air into the pump. A second hose connects to an outlet on the pump and pushes water out.

We discovered the one downside to this pump a few weeks ago. In order to prevent it from being damaged by freezing during the winter the pump is removed from the water in the fall. It must be reinstalled in the spring. This spring the temperatures were slow to warm and we had many days without rain. Since my husband found himself carrying buckets of water from the pond to water things that were newly planted, we knew that the pump needed to be installed. The truth is if I had to install the pump, I would have continued to  carry buckets of water to the plants. Even though I love spending time in the pond in the heat of the summer, it takes several days with temps in the high 70’s or 80’s before I am ready to go in. My husband on the other hand has spent much of his life either playing or working in or on the water. I am sure he has experienced water temperatures like this before.

I was not surprised on May 12th, being only the second consecutive day with a high temperature in the low to mid 70’s, that he decided he had to put the pump in the pond. I’m not sure what the water temperature was, but I do know that it was not warm enough for me to get in the water, and it was not comfortable for him, at least getting in. He asked that I not take pictures, so I complied with his request.  I watched the faces he made as he walked into the water, and introduced his body, especially the sensitive areas, to the cold temperatures, I told him it was ok to cuss. He didn’t. It may have taken about 15 or 20 minutes for him to get the pump in place and afterwards he said “it really was not that bad”.

IMG_1281

When the water is pumped out of the pond we run the hose to one of the strategically located 275 gallon holding tanks. My husband has installed spigots near the bottom of each tank that a garden hose will attach to. He also made a level area on the side of this hill for one tank to sit on. Since getting the water from the tank to the plants requires gravity the raised tank provides more pressure and the tank will drain down farther.

When we use the garden hose to water individual plants we place  wooden stakes at row ends to act as hose guides so dragging the hose does not crush plants.


When we want to use drip irrigation we connect the hose to this pvc pipe that has small holes drilled in it. It is capped on the opposite end.

We also discovered the need to raise the drip pipe up in some areas so my husband went to a pile of limbs, from trees we have cut down, and found some branches that have a Y in them. He cut them so the are about 2 1/2 to 3 feet long and stuck them in the ground. Three of them, appropriately spaced, will support the drip pipe when it is placed in the Y of the three sticks.

While our prayers for rain were many, we are also extremely grateful for the wind that allowed us to irrigate the crops until the rains came.  Last night and today we have had our first sufficient rainfall in several weeks. We will now be able to take a break from watering the crops and face the battle of the weeds that continue to grow with or without water.