Monthly Archives: October 2017

Our Homemade Halloween Costumes

In the 17 years we have been together my husband and I have never been to a Halloween costume party before.  A few weeks ago we received a flyer in telling us that our community was having a Halloween party with food, games, and prizes for the best costume. I set the flyer aside and didn’t think much about it until a few days later when my husband, who had been weeding the strawberry patch all day, told me that he knew what he was going to dress up as for the party.

When he shared his idea with me I thought that it was very clever and would be a lot of fun. I wasn’t surprised that he came up with this cute idea because when you spend all day on your hands and knees pulling weeds you really do have a lot of time to think. Pulling weeds is a very mindless task. I am glad he didn’t want me to guess what he was planning because even though I was certain it would be farming related and that it wasn’t going to cost much, if anything, I would never have thought of this (unless maybe I had spend all day on my hands and knees pulling weeds).

He told me he was going to be a Boo Keeper – think Bee Keeper + Ghost Buster. “I’ll wear my bee suit and carry a net and have little ghosts flying around me and some in the net,” he said. My wheels started turning and in my mind I already had the little Kleenex ghosts made.

About a week later my husband asked what I was going to dress up like for the party. I was just thinking of putting together a scare crow costume out of some of the clothes I have on hand. “You could be a Boo Keeper too he offered, or how about the Queen Boo.” Okay, I liked the idea of Queen Boo. We created both of our costumes mostly with things we had on hand. So here is what we did.

I started with making little ghosts (boo’s). IMG_3355

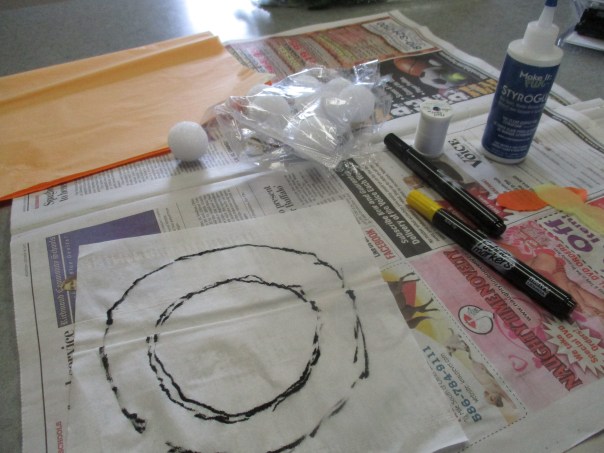
We decided to make them bee-like so I first used markers to put some black and yellow stripes on them. When I went to my craft supplies I discovered that I had some Styrofoam balls that were the perfect size for the head. If I did not have the Styrofoam balls I would have just balled up a piece of newspaper. I centered the Styrofoam ball on the Kleenex then gather the Kleenex around the ball and tied it with thread. I think I learned to make these little ghosts when I was in grade school. I left the thread long enough that I could thread it through a needled and attach it to the costume.

I then cut some wings out of tissue paper and glued them on.

IMG_3367

Our little ghost bees became known as boo BEES. Warning: Please be careful how you pronounce that lest you get the wrong idea.

Next I made my Queen Boo wings. My husband had a spool of wire, so I used the wire to form a frame for the wings. After forming the first wing I twisted the wire around itself then made the second wing and again twisted the wire together in the center. I covered the twisted ends of the wire with duck tape so I would not get poked or scratched with the ends of the wire.

I glued one wing to a full size piece of tissue paper. When the glue was dry I glued a second piece of tissue paper to the other side of that wing. When the second side was dry I cut the tissue paper in the shape of the wing leaving about 1/2 inch overhang. I repeated the process with the second wing.


IMG_3369

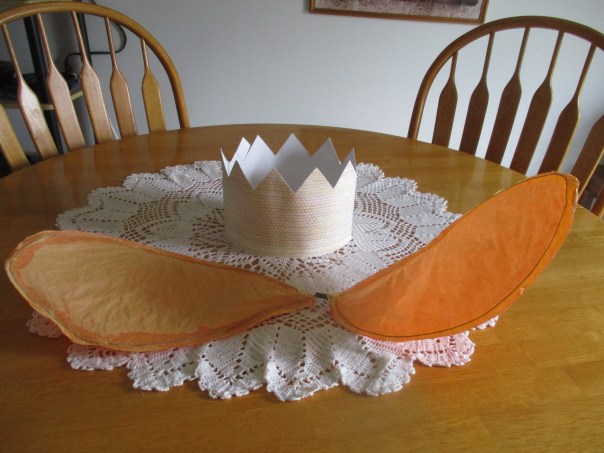
My crown was made of poster board. I wanted it to have a honey comb pattern. To make the honeycomb pattern I decided I could use a wax foundation that we use in the beehives. The bees use these foundation as a base for building their comb. Since the poster board was too thick I decided to use printer paper the make the honey comb design. I placed the printer paper on the wax foundation then colored over it with a brown crayon.

I then  removed the paper from the foundation and colored over the brown honeycomb with a yellowish crayon to give it a honey-like color. I glued the printer paper onto the poster board strip then waited for the glue to dry before cutting out the crown points. I fitted the crown to my head and used tape to hold it’s circular shape.

My husband suggested using glitter on the crown to give it some glitz, but I don’t do glitter. In my personal opinion glitter is an invasive species. Once glitter is introduced into an environment it will spread like wildfire and it seems you will spend the rest of your life trying to get rid of it.

I wore a black turtle neck and black leggings with an oversized white t-shirt that I picked up at Joann Fabrics for $3.00. My husband wore a pair of Tyvek coveralls that he had on hand, then put his bee suit over top. I attached some of the boo BEES to his suit and net and attached some of them to my t-shirt as well. (It’s the worker boo’s job to protect the queen.)

I put on some white face paint to look more ghost-like and my husband picked up some Bit-O-Honey candies for me to pass out.

IMG_3364

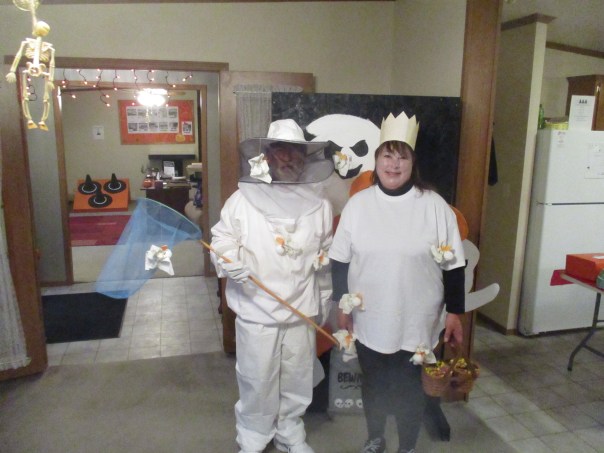
Here we are at the party on Friday evening.

IMG_3365

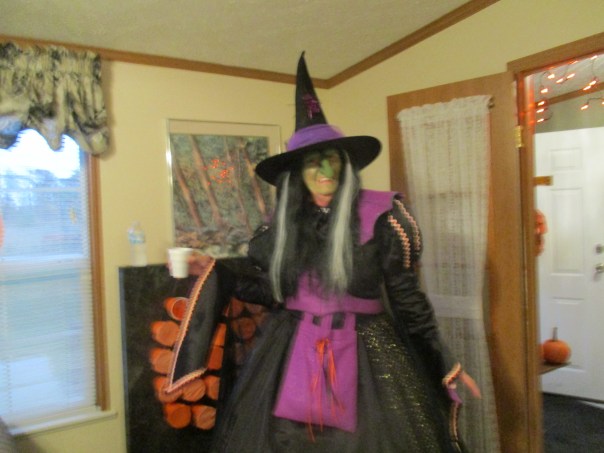
Our neighbor, Maggie, won first place for her wonderful witch costume. My husband won second place a $25 gift certificate and, to my surprise, I one third place a $25 gift certificate as well.

I love that we were able to put a Halloween spin on something that we do in our daily life and were able to create the costumes at little expense. The only money we actually spent on these costumes was the $3 for my t-shirt and a few $ for the Bit-O-Honey candies.

We enjoyed a fun time with some of our neighbors but had to excuse ourselves as darkness fell and duty called. Once out of public eye the Boo Keeper mysteriously morphed into Chicken Farmer and rushed off to close the chickens in the coop where they would be protected from any dangers that were lurking in the darkness.

Note: This is  not an advertisement but years ago I discovered that I can often find t-shirts on sale for $3.00 or less at Joann Fabric. At that price it was worth stocking up so when the kids were in school I would keep a supply of these shirts in various colors. When the kids would come home from school needing a special color shirt for a school activity or project I usually had what they needed. These shirts are designed to be used for craft projects such as tie dye, painting, iron-on, cross stitch and more but are also suitable for wearing just as a regular t-shirt. I in fact have a few in my wardrobe.

I would love to hear your creative ideas for Halloween costumes. Have you ever added a ghostly or funny twist to something you do everyday? Have you made a clever costume out of things you have on hand? Please share your ideas in the comments section below.

Thanks for reading and Happy Halloween!

Celebrating

Woo Hoo! I exclaimed at 1:46 P.M. as the last bulb of garlic was planted. My husband chimed in with a Yee Haw! We began preparing bulbs last Monday and have been working towards todays finale all week long. We were blessed with a week of beautiful weather. We finished up today with 7700 cloves planted, and none too soon as tomorrow’s forecast is for cooler temperatures and lots of rain 🙂

It was 1:56 P.M. while I was cleaning up some of the area when I spotted the Blue Bird. Yes! Our Blue Bird of Happiness paying us a visit to share in our celebration. This evening we wrapped up a few things like running wire and twine around the area to hopefully deter deer and chickens. We would like to invite you to share in our celebration. You can do so by pouring a glass of your favorite beverage and raising it as a toast and/or saying a simple prayer of thanks to God and asking that He bless us with a bountiful crop in 2018. You could also hit the like button at the bottom of this page or leave your comments to let us know you care.

If you would like more information about what was involved in our garlic planting activities this week please check out this page https://donteatitsoap.com/a-year-in-growing-garlic/  that details our 2017 garlic growing season.

Thanks for reading and God Bless.

Fall Activities

To start off this post I want to send a great big Thank You to anyone reading this. My readership is growing and in the past few months the number of people who are following my blog has doubled. It’s still not a big number but it is very encouraging. Having followers is kind of like making new friends. Followers can visit our farm through many of the pictures I post and can keep up with what we are up to just by reading along. It’s always exciting when somebody hits the “like” button or I get hits off Facebook indicating that somebody liked my writing well enough to share it with their friends. Best of all is when someone takes the time to leave a comment.  It’s almost as good as having friends stop by for coffee and a chat. So again thank you to all those who are reading.

This is a quick update on some of our fall activities before we begin planting garlic this week. If you are interested in what we will be doing with garlic planting you can check out this page https://donteatitsoap.com/a-year-in-growing-garlic/ .

IMG_3325

My husband has been working on expanding our strawberry patch. He first weeded  them then cut and transplanted runners before mulching with straw. Since this picture was taken he has finished the center so there is now 7 full rows of strawberry plants. We are praying for a bountiful crop in 2018.

After finishing the strawberry patch he moved on to the asparagus bed. We added to the asparagus this spring so we now have around 100 plants. Over the past few days he has cut down the ferns that were dead leaving a few that were still green. With hands and knees in the dirt he weeded the areas directly around each plant. He then tilled in between the rows. Since I didn’t get a picture you’ll have to trust me when I say it looks beautiful. Straw will also be used to mulch the asparagus before winter sets in.

He has cleared out most of the garden since nearly everything is done producing. He cut corn stalks and gave some to friends and neighbors to use for fall decorations.

While he has been busy with all of the fall farming activities my time has been split more between the farm and the house. My activities at the farm were mostly preparing the prayer garden for winter.

IMG_3329

I gave it a good weeding, then I trimmed dead foliage and blossoms from most of the plants. I left any blossoms that were still open, as they were being used by bees and butterflies in search of food. I also dug out some Irises because they were spreading beyond where I wanted to go. I gave the dug up Iris bulbs to a neighbor who was happy to receive them.

At home I cooked up and froze pumpkins from our one volunteer pumpkin plant that produced this year. It was not a pie pumpkin but it made a fabulous pumpkin pie.  You can find my pumpkin pie recipe here https://donteatitsoap.com/2015/09/22/pumpkin/   I froze several packages of eggplant and I turned some of the strawberries, that I had froze in June, into jam. I also filtered the beeswax that had been tucked in the freezer after the our honey harvest.  Check out this post to see how I filter beeswax. https://donteatitsoap.com/2016/06/06/filtering-bees-wax/

After several months of not making soap, I made two batches last week. The first one I made was Sweet Dandelion. Since it was such a big hit when I made it in the spring, I knew that I would want to make another batch so even though they were nearly done blossoming, in late June I walked the farm in search of dandelions. I was able to find enough to make a pot of dandelion tea and infused the rest in some sunflower oil. I froze the dandelion tea and I had both of my key ingredients ( tea and oil) last week when I was ready to make this soap.

The other soap I made was coffee soap. I am really looking forward to trying this soap because I used a new and (hopefully) improved method. I will post about it in the future, probably in six weeks or so when the soap is ready.

For now I must refocus on the task at hand – garlic planting, so until next time I wish you well.

It’s Been A Grape Year

In general I can’t say it was a great year for growing food. Some crops like squash failed to produce, and most, including strawberries, asparagus, tomatoes, corn and melons yielded only a fraction of what we expected.  Despite the late spring frost that killed off all of the newly unfurling leaves, our grapes were one of the exceptions. So I can say it was a grape year.

IMG_3272

Our grape arbor was started in 2012. We put up the three posts and then transplanted some grape vines, that were growing in our back yard, in between the posts. We had purchased the hardware and the wire that we intended to use to support the vines, but with so many projects on our to-do list finishing the grape arbor did not become top priority until last spring. Each year as the vines grew we would stake them and/or fence them in attempts to keep them growing upward and prevent the deer from annihilating them. (notice the grape vine tied to a stake in the picture below) Each year we have harvested modest crops, some years better than others.

Last spring after purchasing a couple more grape vines to plant in the grape arbor we decided it was time to finish this project. We wanted to give the grapes two wires to climb on. To hold the wire we used eye bolts. The eye bolts were screwed into each of the three posts at the same level. The wire was twisted around the eye bolt on one end, then ran through the eye bolt on the center post for support, then twisted around the eye bolt on the other end post. In theory if the wire starts to sag the eye bolt on either end can be tightened to provide added support.

IMG_1073

As with all of our crops this year the grapes did require watering, but the fact that they escaped the fate of the deer can only be counted as a gift from God. Our first harvest weighed in at about 20 lbs. I decided to turn this into juice.

IMG_3290
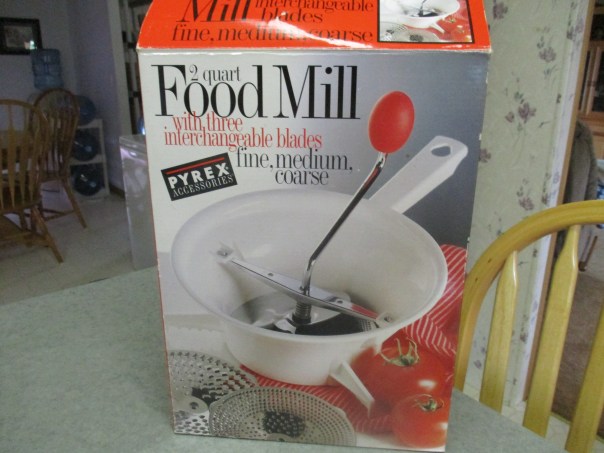
In the past I have made grape juice according to these instructions from the National Center for Home Food Preservation http://nchfp.uga.edu/how/can_02/grape_juice.html and while the juice has good flavor I always feel guilty about wasting the pulp, skin and seeds. Last year I canned the juice without allowing the sediment to settle out and found that the juice was thick and delicious. This year I decided to have even less waste. Here is what I did.

Wash grapes and remove them from the stem. I make a point to wash and inspect each individual grape because little spiders like to make their homes amongst these grapes and I sometimes find spider nests attached to them. These must go!

Put the grapes in a pan and mash them with a potato masher.

Add enough water to cover the grapes.

Bring to a boil and cook for 10 minutes.

IMG_3267 I then ran the grapes through this food mill. I used the medium blade which filtered out seeds but turned the pulp and skin into juice. Pretty much the only thing that was not turned into juice were the seeds and judging from the crackling sound of grinding grape seed small particles of seed may have ended up as juice as well. I am ok with this. No, actually, I am very happy about this. You see the grape skin and seeds are said to be the healthiest part of the grape. https://www.livescience.com/54581-grapes-nutrition.html  After juicing the grapes in the food mill I proceeded to can the juice according to the NCHFP link above. I did not add any sweetener to the juice as my husband prefers the tartness of the natural juice and to sweeten my juice I add a bit of our raw honey before I drink it. This 20 pounds of grapes yielded 7 3/4 quarts of delicious, thick and healthy grape juice.

After harvesting the first 20 pounds of grapes there were still some grapes left on the vines. I wanted to experiment with making a wine without adding yeast and decided that using grapes was the way to go. I did an internet search and came across this recipe http://www.roughdraftfarmstead.com/2012/05/24/easy-homemade-wine-recipe/ .

I harvested the remaining grapes and while the recipe calls for “preferably unwashed fruit” I had to make sure there were no spiders or spider webs left behind and rinsing them under running water seems the best way to do this. After I rinsed the grapes and removed them from the stems I had about 5 lbs. of grapes. I decided to let them sit for a few hours in hopes of reclaiming some of the yeast that I had rinsed off.

The mashed fruit did not nearly fill up my two gallon crock so I decided to add enough water to just cover the fruit. I also added about 1 1/2 cups of our raw honey. I stirred the mixture and covered it with plastic wrap. I didn’t stir the mixture nearly as often as is recommended in the recipe but at least once a day. In a few days I could tell that fermentation was underway. The bubbling was not as apparent as when I have added yeast to make wine, but when I stirred the mixture the bubbles were there and it had the smell of alcohol. I also tasted the wine as it fermented by sipping whatever drops remained on the spoon after I stirred it. The grapes fermented in the crock for approximately two weeks before I had time to siphon the wine into a one-gallon bottle. I placed a balloon over the top of the bottle but after a couple days of the balloon not rising and no apparent bubbles I decided the fermentation was done. I could have transferred the wine into bottles and corked them but the wine seems to be disappearing (not evaporating) quickly enough that this would be a waste of time.

Personally I am not much of a wine drinker, and when I do imbibe I prefer a sweeter wine, so I am not the best person to judge this wine, but if you want my opinion I would say it is a “good” wine. It’s definitely not a “fine wine”  and in my opinion it is not nearly as delicious as the grape juice. My husband, who likes dry wine, is  enjoying it, and I have been drinking a glass now and then for it’s health benefits.   https://www.prevention.com/health/healthy-living/health-benefits-of-red-wine/slide/9

I consider this experiment a success. I can indeed make wine without added yeast and I plan to experiment more with this process more in the future.


Making Tomato Sauce

I have been asked several times by friends how I make tomato sauce and I usually answer “cook it, cook it, cook it, and when you think it is ready, cook it some more.” Making a thick tomato sauce takes lots of time.

There is, however, much to do before you get to the cooking part and that is what I want to address today. To start with there are many, many varieties of tomatoes and although I do like to start with a paste tomato, Amish paste or roma’s, you can use any type of tomatoes for making sauce. Along with Amish paste I use any tomatoes that are ripe and will not be eaten fresh in the next day or two. I will even throw cherry tomatoes into the mix rather than see them go to waste.

In addition to taking a lot of time to make tomato sauce it also takes a lot of tomatoes to make sauce. It takes approximately 5 or 6 lbs. of tomatoes to make 1 quart of tomato sauce. So don’t be shocked when that shopping bag full of tomatoes ends up providing only a couple of spaghetti dinners for the family.

Now before you “cook it, cook it, cook it” you must first turn those tomatoes into juice and the are many ways you can accomplish this. I will share some of the methods I have used over the years including the steps involved and equipment required. If you have never made your own tomato juice or sauce keep reading.

When I first started making tomato sauce I did not have some of the equipment that I use now days so I used what I had on hand to juice the tomatoes – a blender. With any of these methods I start by washing the and any tomatoes that have rotten spots are discarded. When using the blender after washing the tomatoes I remove the skins by blanching the tomatoes. This is done by putting the tomato in a pan of boiling water for about a minute then immediately putting the tomato in a bowl of cold water. For this step I placed the tomatoes in a blanching basket or a wire basket that sits inside the pan of boiling water, then to remove the tomatoes from the pan I simply lift the basket by the handle and dump the tomatoes into the cold water. If you don’t have a blanching basket you may be able to use a metal colander or even just put the tomatoes in the boiling water and lift them out with a slotted spoon.

When the tomatoes are cool enough to hold I cut out the core of the tomato with a paring knife and then the peel of the tomato will slip right off. I then cut the tomato in half horizontally and scoop out (some of) the seeds. I don’t worry too much about removing all of the seeds because my family really doesn’t mind having seeds in their tomato sauce.

I then cut what is left of the tomato into small pieces and put it in the blender and blend it into juice. At this point I could of pour the juice through a sieve or fine mesh strainer to remove any seeds that remain. The juice is now ready to be cooked into sauce.

Over the years I have acquired some equipment has made this task easier. The first piece of equipment is this simple and inexpensive food mill. I’m sure I paid less than $20 for it several years ago when I purchased it.

IMG_3267

This food mill will sit on top of various size pans or bowls but must be held in place with one hand while turning the crank with the other hand.

When I use this food mill I wash the tomatoes, cut out the core, cut them in quarters and cook them until they are soft. Once they are soft this food mill will easily remove the skins and seeds and turn the tomatoes into juice.

IMG_3268

I use the medium blade and it does tend to get plugged up quickly. When it gets plugged up I need to scrape the pulp off the bottom of the blade (the pulp is part of the juice) and empty the seeds out of the top part of the food mill. The seeds are fed to the chickens later.

IMG_3269

While this method does not require blanching and removing the skins, it does take time to cook the tomatoes before juicing them. Once the tomatoes are cooked the skins break down easily and are mostly turned into pulp adding to the thickness of the tomato sauce. I tend to use this method when I am working with smaller batches.

When I am working with larger batches – a bushel or a shopping bag or more full of tomatoes, I use another piece of equipment that I have acquired in recent years.

It is another type of food mill or juicer. I actually have two of these, one was given to me by my mother and one was given to me by my father-in-law. Both of the models I have are very old and also very functional. Similar models are still produced today but they are quite pricey.

IMG_1688

My biggest problem with using this food mill is that it is designed to clamp to a counter top. Our home, however, was not designed with this kind of equipment in mind. The clamps will not fit over the lip on our countertops. In order to use this food mill I have to clear off this stand alone shelf that normally houses my food processor, nutri-bullet, and most of my stoneware baking dishes and move it to a location where I can clamp the food mill onto it and be able to crank the handle. I also have to set a chair next to the shelf to hold the pot that the juice runs into. Rearranging all this furniture can be a pain in the you-know-what so I usually only use this food mill if I am making a big batch. Once the food mill is set up the process goes pretty quickly. I just wash the tomatoes, remove the core and cut them up. I put the cut up tomatoes into the hopper and turn the crank and the food mill separates the juice and pulp from the skin and seeds.

I am certain that there are other methods that could achieve the same results and depending on the equipment that you have available you will figure out what works best for you.

Once your tomatoes are turned into juice it is time to cook the juice into sauce. You will be cooking the water out of it. I bring the juice to a boil then let it cook uncovered over a medium or medium-high heat until it is reduced by approximately 2/3rds to 3/4ths as the sauce gets thinker it may be necessary to reduce the heat even more to prevent scorching. Depending on how much juice you are reducing this cooking will take anywhere from several hours to a whole day. Since smaller amounts take less time to cook it may be wise to split a large batch into smaller pots to reduce the cooking time.

While the sauce is cooking I stir it occasionally, as it gets thicker I stir it more often to make sure it does not scorch. When it gets to the point where about 1/3 of the amount I started with remains in the pan I reduce the heat and I start watching it more closely. When the sauce is cooking for a while without being stirred the water will rise to the top, if the layer of water covers the entire top of the sauce I keep cooking. If less than 50% of the sauce has a thin layer of water on it the sauce is probably thick enough for me.

How thick the sauce should be is really about personal preference and how the sauce will be used. For instance if the sauce will be used in a pasta or rice dish where it is mixed in and the water can be absorbed into the rice or pasta a thinner sauce might be appropriate, but if the sauce will be put on top of pasta the remaining water will drain through the pasta and run off the plate, so a thicker sauce is what you want.

I hope that you find this post useful if you intend on making your own tomato sauce. If you have any questions, comments or suggestions please leave them in the comments section on this page, and if you like what you have read please feel free to share it.