We have been using a lot of maple syrup lately. It’s delicious on our French toast or waffles that we have been having for breakfast several times a week, but have you shopped for maple syrup lately? I’m talking about real maple syrup not, the corn syrup that is flavored up to taste like maple syrup. It’s expensive. So much so that we have recently opted for the fake stuff in effort to keep our grocery bill down. Real maple syrup has truly become a delicacy. A quick check at the Walmart website showed me prices ranging from 54 cents up to 94 cents per ounce. 54 cents might not seem like much but you don’t buy just one ounce. 12 ounces at 54 cents is $6.48, a quart which is 32 ounces at 54 cents would be $17.28, and a gallon which equals 128 ounces at 54 cents per ounce comes to $69.12. Keep in mind those are the low end prices; at 94 cents an ounce a gallon would cost over $120.
So considering this, and that fact that we have had the equipment needed for tapping the trees and collecting the sap, stored in our shed for the past few years, tapping some maple trees was a no-brainer.
We have been watching the weather forecast for about the last two weeks, since sap flow is dependent on the weather. Basically sap flows from trees that are still dormant when temperatures rise above freezing during the day but fall back below freezing at night. For a thorough explanation click here http://maple.dnr.cornell.edu/produc/sapflow.htm Since todays temperature was forecasted to be in the high 40’s or low 50’s and daytime temperatures for the next week to be mostly above freezing, it seemed like a good day to get the trees tapped.
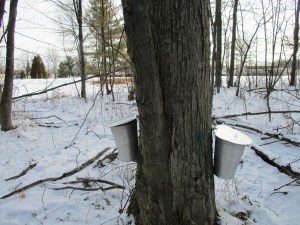
After breakfast, we started out by tapping some sugar maples.

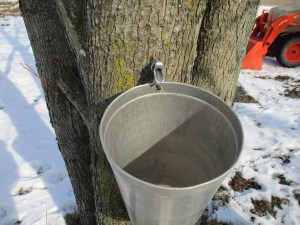
We used manual drill, and when I did the tapping of one of the trees I was surprised at how easy it was to drill the hole. A few things to note about drilling are that it should be done at a slight upward angle and drilled no more than 2 inches into the tree. I’m not sure if you can see in the picture that the drill bit had a piece of tape on it to mark the 2 inch mark. Recommended height is a height that is comfortable, so reaching up or bending down is not necessary. Also the ideal spot is one that has not been previously tapped and has no visible scars.

After drilling the hole the spile is tapped into the hole. Again I was somewhat surprised at how easy it was. It only took a few gentle taps with a light hammer and the spile was securely in place.

The next step was to hang the sap bucket. The bucket has a small hole in it, and the spile has a hook below the spout that is designed to hold the bucket. When the bucket is hung from the hook the spout then reaches over the top edge of the bucket. When the sap flows from the tree it runs down the spout and into the bucket.

The final step in the tapping process is to install the lid. Fortunately we had figured out how to assemble these a few days prior to doing the tapping, as it was a bit of a puzzle. The back edge of the lid is folded over but cut out in the center. There is a very thin metal rod that gets inserted through the first half of the fold. It then goes through two holes that were drilled into the top of the spile, then lastly through the second half of the fold on the lid. At this point the lid is secured to the spile, and it only rests on the lip of the bucket. The lid sits on an angle and has quite a bit of overhang, so it does serve to keep rain, potential snowfall, and anything else falling from above, out of the bucket. It does not sit tight on the bucket, so there is still a chance that things such as bugs or anything coming at it from the proper angle might get in. Those things can be filtered out later. This design allows for the bucket to be removed from the spile, for empting, without having the lid in the way. A very clever design.
http://maple.dnr.cornell.edu/FAQ.htm gives this information to determine how many taps a tree can support. “How many taps should you have on a maple tree?
A healthy tree 10-17 inches in diameter (31-53 inch circumference) should have no more than one tap. A tree 18-24 inches in diameter (57-75 inch circumference) should have no more than two taps. A tree larger than 25 inches in diameter (79-inch circumference) should have no more than three taps.”

We put half of our 18 buckets on sugar maples, but we also wanted to tap our silver maples at the farm. While silver maples indeed produce sap, it is said that they are not idea because the sugar content is lower than that of the sugar maple, thus requiring more sap to make the syrup. They also bud out earlier, therefore they have a shorter sap flow season.
The first thing we noticed when tapping the silver maples was that the sap began to flow immediately when the tree was drilled. Because it is clear it doesn’t show up in this picture, but there is sap coming out.

Unlike sugar maples that have a single large trunk growing straight up, the silver maple tends to have many trunks growing from near ground level. They grow outward on an angle. Because of this the buckets do not hang very straight. They will need to be emptied more often to prevent the sap from spilling over the side.
Upon seeing the sap run from the tree my husband tasted it. This was no surprise to me since he has a long history of tasting sap. As a kid he worked for a neighborhood maple syrup operation, and ever since I’ve know him, whenever he sees sap coming out of cut wood, even if it’s burning in the fire place, he dips his finger in the sap and tastes it. When he tasted the sap from the silver maple he responded with “it’s sweet, it has good sugar content.” I then tasted then sap and learned that my palate is not as refined as his. To me it tasted like water with just the slightest hint of sweetness. This makes sense to me because the sugar content of the sap from and sugar maple is reported only to be between 2 and 3% and the sugar content of the silver maple sap is between 1.5 and 1.75%.
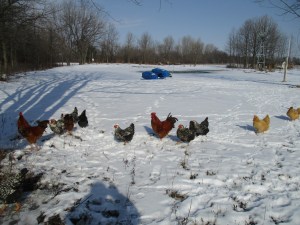
As with most things we do at the farm the chickens had to investigate. (and who doesn’t love a good chicken picture)
Tapping the trees is only the beginning, and I might add the easy part, of making syrup. With that statement I must correct the comments made on my earlier post. https://donteatitsoap.com/2016/02/17/can-you-guess-what-we-are-doing/ Erin’s comment was, “Dad says gathering maple syrup” and I replied “Dad is correct”. What I should have said is that dad has the gist of what we are doing, but technically (and I’m sure Dad knows this) you don’t simply gather maple syrup from a tree. The sap buckets will be checked at least twice a day, and the sap that is collected in the buckets will only become syrup after a long boiling process. It will take 40-50 gallons of sap to boil down into one gallon of syrup. So as we continue to collect sap and make syrup I will post updates on our progress. I hope you will check back to see how it goes.

 I do plan on taking lots of pictures an writing about it as we go so check back later this week to see how things are going.


