I’ve already picked my rhubarb and hopefully if yours is up you have as well, but in light of the freezing temperatures forecast in our area tonight, I thought I would pass along this information. http://web.extension.illinois.edu/state/newsdetail.cfm?NewsID=30622
All posts by ruthsoaper
Bath Day For The Boys
One 90 lb. Scout + one 120 lb. Trooper on bath day = one big job. What makes it somewhat easier is the fact that they are well behaved when they get their bath. Yesterday when I announced to the Boys that they were going to get a bath they both came into the bathroom and looked at the tub. I still needed to get things set up for them, so I told Scout he had to wait a few minutes. He laid down to wait.

We used to give them both their bath’s in our garden tub. My husband hooked a shower hose to the tub faucet and this works well.

We usually bathe them one at a time, but one time my husband actually had them both in the tub together.
Trooper still gets his bath in the tub, but Scout’s advanced age prevents him from jumping into the tub like he used to. Nowadays I remove our glass shower doors so that Scout can just step into the shower. I kneel on the floor beside the shower and wash him up. He loves the attention and he loves it when we tell him he is a “clean puppy”.
A few years back, after I began using my homemade soap for washing my own hair, I decided to try using it on the boys. Buying dog shampoo can be expensive, the highly perfumed fragrance of these often has adverse effects on my sinuses, and getting these shampoos completely rinsed out of the boys coats was a nightmare. Using the soap, on the other hand, there are no added fragrance. It provides a lather that penetrates even Trooper’s extremely thick coat and under coat yet it rinses out nicely. Yesterday I used Aloe Soap but I sometimes use my Hair Care Soap that I use on my own hair.

After their bath my husband had them lay on the blanket to dry and he gave them a nail trim.
Last night as I petting each one and saying good night I noticed how exceptionally soft Troopers coat was and even Scout’s wirey hair had a softer feel. Indeed, Don’t Eat It! Handcrafted Soaps are good for the whole family, including the dog.
Hint of Mint Soap (New and Improved)
“You have to write a post about your mint soap,” my husband has said this to me more than once in the past week. I gave him a bar of my latest batch to test last week and you can probably guess, he likes loves it.
I first experimented with adding mint to soap last year. https://donteatitsoap.com/2016/03/06/new-soap/ The results were a nice soap but not really what I had hoped for. About two months ago I made another batch of mint soap and decided to boost the mint properties by using mint infused oils. I infused my dried spearmint leaves in water as I had in the previous batch. In addition I used sunflower oil that had been infused with spearmint and I put a tea bag with dried mint leaves in my oil mixture as they were heating and then cooling before being added to the lye mixture. I removed the tea bag before I blended the lye mixture with the oils. After mixing the oils and with the lye mixture I also mixed in the mint leaves that had been infused in the water. The soap was in the molds for two days before being cut into bars and then it cured for six or seven weeks before we tested it.
I tried the new recipe first because my husband was still using up another bar of soap. My first impression was nice bar of soap – good lather- rinses off well. After my second or third use I began to detect a light mint scent. I also noticed a light refreshingly cool feeling on my skin as I rubbed the soap on. On the first day my husband showered with the soap he said, “it’s a nice soap.” When I asked him if he could smell or feel the mint he said, “Honestly, no.” The following day, after his shower my husband came to me, “I really like the mint soap,” he said. “I could smell the mint and it feels really nice. You did a good job. You better blog about it.”
The fragrance and cooling effects are pleasantly subtle, the lather is nice and this is a hard bar of soap that will last a while and it is husband approved. Anyone interesting in purchasing this or any of my other products that can be found in my store can email me at ruth20012001@yahoo.com and put soap in the subject line.
Awaiting Their Arrival
It was no surprise when the pair of killdeer showed up in the spring. It is our assumption that it is this same pair that show up every year and build their nest in inconvenient places on our farm. The first couple years the nest was right on the edge of our driveway. My husband put large rocks near it so that it would not get run over. After we put in the pond they nested just off the beach for a couple years.
This year when I saw the pair hanging out in the prayer garden everyday I told my husband “I’m sure they have a nest there. I just don’t know where.” I was concerned because I didn’t want to accidently step on it. As my husband examined the area he pointed out the three eggs that were camouflaged in the wood mulch nest.
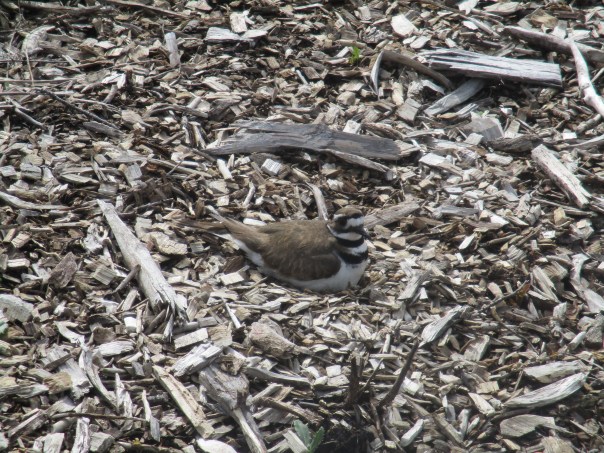
Now we visit Momma Killdeer, who also blends into the background, every day as we walk past. She often just sits on the nest while we stand as close as five or six feet away. Other time she gets disturbed and screeches at us. I’ve reminded her several times that she was not invited to use our prayer garden as her birthing room, and since we intend her no harm she will have to put up with us. Sometimes Daddy Killdeer will show up and do the broken wing act to try to lure us away from the area. He does this more often if Scout and Trooper are near. In prior years the boys seemed to enjoy the chase but this year they don’t seem to pay much attention.
Since they have been there for several weeks now, we expect the chicks to hatch soon. The link below says that killdeer eggs take 24-26 days to hatch and then the parents guard them for another 25 days until they are old enough to fly. Although the screeching killdeer can be annoying, the baby killdeer running around are incredibly cute. These killdeer, who are bug and larva eaters, will do their part in keeping insect populations down, and we consider them a welcome addition to our farm.
Two New Soap Recipes
I am really excited about the two new soap recipes I made this week. The soap I made on Monday was inspired by the dandelions that are popping up everywhere screaming “spring is here.” I decided that those yellow beauties might just make a nice soap.
Usually before I try something new with a soap recipe I do an internet search to see if others have done similar. Artisan soap makers are a creative bunch and it seems there is not much they haven’t tried and wrote about. I did indeed find several sites with dandelion soap recipes, stories, and for sale. I do not use other peoples recipes but I like to get an idea of how others have used particular ingredients, what the results were and if there is anything major that might go wrong.
By this time I have learned that when adding botanicals to cold process soaps you will very rarely capture any fragrance and I have no way of testing to see if any potential therapeutic benefits from them survive the process. The most I could hope for is to capture some of the cheery yellow color. Hoping to double up on any benefits I infused both the water and the oils with dandelion flowers. I decided to add honey as well.
This recipe is now out of the molds and has a deep yellow color. It still has to cure for about six weeks and doubtless the color will change as the soap cures. I’ll let you know how it turns out.
Todays soap experiment is maple. When I did my internet search for maple soap I found that maple syrup is often used as an ingredient in handcrafted soap. My plan was a little different. When my husband was collecting sap to make syrup this spring I asked him to save me a couple of quarts so I could make a batch of soap with it. “Are you sure you know what you are doing?” he asked. I explained that I plan to use the sap in place of the water in my soap recipe. He graciously obliged my request and I have kept the sap in the freezer waiting to be turned into soap.
One morning when we were having our homemade syrup on our pancakes and I looked at the sugar sand that had collected at the bottom of the jar and wondered about using it in soap. Will the sand particles remain sand or will they dissolve during the processing. I remembered reading that it is mostly composed of calcium salts and malic acid. It is not harmful to eat and upon further research I learned that those ingredients can be beneficial for skin care. Again I can’t make any claims about my soap providing these therapeutic benefits because it is questionable whether they survive the soap making process. The sand in that jar was gone before I had a chance to tell my husband that I wanted to save some for making soap. We had a few more jars with sand at the bottom, so I opened one this morning, poured most of the syrup into an empty jar and put it in the refrigerator for future breakfast. The sand and a small portion of the syrup that was left in the bottom of the jar were added to my soap.
The maple soap, if it turns out well, will definitely be a seasonal soap and I expect the sweet dandelion soap will be as well. Although they won’t be ready for 6+ weeks you can contact me by email ( ruth20012001@yahoo.com) if you are interested in purchasing either of these soaps. 🙂
