What Is Lacto Fermentation
Simply put Lacto Fermentation is a process that uses salt water also know as brine to ferment vegetables. For a more detailed explanation you can click here. Sauerkraut and pickles are probably the most commonly lacto fermented foods here in the USA. However not all pickles are made using lacto fermentation and although sauerkraut may be made using this process it is often pasteurized (canned) thus killing the probiotics and depleting the nutritional benefits of fementing.
Getting It Right
As I mentioned in my last post I have done some fermenting in the past. Sometimes they turned out good and sometimes they did not, so recently when I was reading about lacto fermentation I was mentally taking notes to see what I may need to do differently.
After reading this article , choosing the right type of salt seemed like something that could be a key to getting it right. In the past I had used either pickling salt or kosher salt. I had thought that they were pure salt and varied only in texture. I did not realize that they may have anticaking agents added which may effect the fermentation process. It is also worth pointing out that some sea salts may have anticaking agents added.
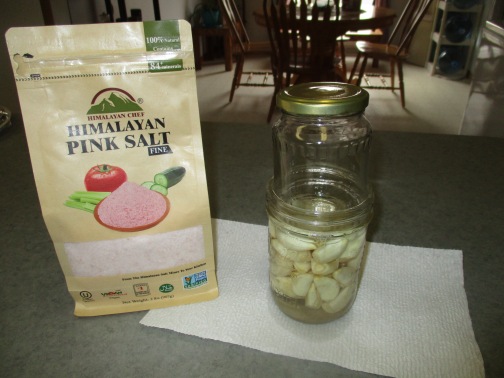
When we visited our local health food store and I asked the sales person about salt she showed me the three varieties that they carry. They included Celtic Sea Salt, Himalayan Pink Salt, and a product called Pure Salt. She told me she had used each of these salts and all of them work great for fermenting foods. I chose Himalayan Pink.
Water was another concern. I knew that I must use water that was not chlorinated for making the brine but what I had not thought about was the water I was using to clean the vegetables. I had been using our tap water (which is chlorinated) to clean my vegetables and probably killed off some or all of the healthy bacteria that was present. I have since started using filtered water to clean my vegetables.
The last decision I made was to only do small batches. Although I have fermenting crocks, (2 gallon and 5 gallon) for a couple of reasons fermenting in quart and pint size canning jars seems to be a better option. Since it is just my husband and I at home we are not likely to eat two gallons (or more) worth of sauerkraut (or any other vegetable ferment) before it passes it’s prime. Additionally if I ferment a smaller amount and for some reason it goes bad I only wasted that small amount. Even if I want to do larger amounts it seems wise to use the canning jars as they are easier to store in the refrigerator and I could gift them to family or friends.
My Process
Since we still have some home grown garlic on hand I decided to start with fermenting a jar of garlic. As you can see in the photo above I used a wide mouth pint size canning jar. I (kind of) followed this recipe. I actually had to chuckle when I read their instructions for peeling garlic cloves. If you have been following my blog for a while you probably already know that I highly recommend using these silicone tube garlic peelers.

I peeled enough garlic to fill my jar leaving about 1/2 inch of space at the top. I mixed two tablespoons of Himalayan Pink salt with one quart of non- chlorinated water and stirred it until all of the salt was dissolved. I the poured enough of the salt-water (brine) over the garlic to cover the cloves. Since the garlic cloves floated up and some parts were no longer covered with brine I needed to weigh them down. I had a smaller jar that nested nicely inside the wide mouth jar. Perfect! I then slipped a jelly bag over both jars and secured it with a rubber band to keep fruit flies out. Any clean cloth would have worked for this purpose I just happened to have a jelly bag. I then stored the extra brine in my refrigerator in case I needed to add more or to use for my next batch.
I left the jar of garlic sitting on the counter in the kitchen for about 10 days. I checked it every couple of days, by tasting it, to see if it was ready to be moved to the refrigerator where the fermentation process would be slowed down significantly. I determined it was ready when the garlic had developed a milder and a somewhat sweeter flavor and the brine was infused with the garlic flavor. The cloves had begun to soften but still had some crunch to them. Determining when the vegetables are ready really is subjective – if you like the flavor and texture then they are ready. 🙂 To refrigerate them I removed the jelly bag and small jar. Then I capped them with a regular canning jar lid.
Eating Fermented Garlic
We are now enjoying eating fermented garlic. In fact the jar is more than half gone. It has a pickled garlic flavor. I try to include a couple of cloves in our diet each day. Our home grown garlic has a stronger (hotter) flavor than any garlic that we have found commercially available and even fermented it has retained some of it’s heat. My husband, who will often eat raw cloves of garlic despite tears coming to his eyes as he chews it up, will eat a few whole cloves of the fermented garlic as a side dish with his lunch or dinner. I, on the other hand, prefer to slice the cloves and add them to a salad or a sandwich or throw a few slices on top of my spaghetti. However we decide to eat them it is important to keep them raw in order to reap the benefits of the probiotics.
Next Up
Sauerkraut! I originally planned to include it in this post but since this post is getting long I will dedicate a separate post to sauerkraut.
Have you ever eaten pickled garlic? Do you have a favorite fermented vegetable or recipe you would like to share?
