A few days ago, as we prepared to get chicks, my husband brought in the stock tank that we use as a brooder. When Scout saw this he began looking around for the chicks. We had to tell him “not yet, Scout”. We weren’t planning on getting the chicks until the following day. Scout has been down this road before, in fact 4 out of the past five years we have brought home baby chicks and raised them.
The first year I had great concerns about Scout being around the chicks. When we adopted him from the shelter in 2011 we were told he was about 3 years old and part terrier. Nobody knows what kind of terrier but that was not important to us. Over the next several years we found that he definitely had the terrier instinct to hunt and kill small animals and he was quite proficient at it. He could quickly and cleanly dispatch a raccoon, possum, ground hog, cat or baby turkey by just snapping it’s neck. He was about eight years old when we first started raising chickens.
I pretty much left it to my husband to train Scout with the chicks. Dom would hold a chick and let Scout sniff it and nudge it with his nose and he would tell Scout that those were his (Scout’s) babies. “You have to be nice to your babies,” we would say. Scout would become very excited, and want to look into the brooder, whenever he would hear the chicks make a noise, and anytime my husband or I were doing anything with the chicks (feeding, watering, holding or cleaning the brooder) Scout wanted to be involved.
That spring Scout learned that he was not allowed to chase and kill the chickens, unfortunately it was at the expense of one of our hens, but for a dog of his age and breed to learn not to chase chickens, or any other small critter, is a huge success.
Scout Welcoming Our New Chicks
Nowadays I have no concerns about Scout chasing the chickens. Our free range chickens wander, peck and scratch throughout the farm and we have total confidence that neither Scout nor our other dog, Trooper, will cause them any harm.
One of Scout’s nicknames is “Chicken Daddy”, and he loves it when we tell him he is a good Chicken Daddy. At age 13 (in people years) Scout has slowed down a lot. He does not pay as much attention to the chicks, but he was still very eager to see/sniff them when we brought them home.
The other thing he really enjoys is helping close up the chicken coop at night. When we go into the coop to count chickens and make sure everyone made it back home, Scout will step inside and sniff a couple of chickens to say “good night to his babies”.
Last year we were curious about coloring brown eggs, so we decided to try it. This year, since I decided to make deviled eggs for today, I thought I would color them first and share my results, in case anyone else is curious.
I used regular food coloring, something I vaguely remember doing as a child, before Paas came out with the egg coloring kits.
The eggs I colored were varying degrees of brown. I follow the directions on the food coloring package – 1 tps. of white vinegar, 20 drops of food coloring and 1/2 cup of boiling water. Since I didn’t have 20 drops of red food coloring I mixed 15 drops of red and 5 drops of blue, which gave me the maroon color. The two on the top left are blue, the two on the top right are green, the two on the bottom left are maroon and the two on the bottom right are yellow. The eggs that were darker brown going into the dye came out in darker shades than the ones that were lighter going in. The answer is: while brown eggs don’t make pretty, pastel Easter eggs, they indeed can be dyed.
I’ll also add a quick chicken update.
This past Monday as our Buff Orpington chicks turned 4 weeks old, and are now feathered out, we moved them to the farm. They seemed to be getting bored in the hutch on the deck and needed room to roam.
They rode in this crate to the farm.
The Chicken yard was busy when we got there, but when the big birds realized that we did not bring them treats, most of them went off to find their own goodies.
My husband had added new roost space inside the coop, enough to accommodate 30 chickens. Before bringing out the young ones today he also penned in an area around the small chicken door to keep the young ones close to the coop.
The big birds will use the big (people) door for now.
Some of the big birds were curious.
Some even came and visited. The big hens gave the little ones an occasional, intimidating, peck, but it was mostly if they got too close to the food (treats). We had to move the big hens out of the penned area because they could not find the way out on their own. At night my husband put “the group of 8”, as he is fondly calling the young buffs, into the coop where they huddled together in one of the nest boxes. “The Group of 8” spent their fist couple of days mostly inside the coop, and my husband found it necessary to open up the penned in area because the big birds would get in and be trapped there.
Yesterday “The Group of 8” spent the day out on their own. They mostly stayed together and sometimes with the rest of the flock. There has been no signs of aggression from the big birds, but I wouldn’t think there would be from a group who will share their living quarters (food and all) with 20 or more starlings during the winter. “The Group of 8” is now in training for their nighttime routine which includes returning to the coop at night and using the ramp to get inside. I’m sure they will catch on quickly.
After Monday’s move, we decided to make it a full house (coop). Since we only had 24 birds we went to the farm store for 6 more. Again they did not have the breed we were looking for (Buff Orpington) so we decided this time on Barred Rocks.
Upon adding this “six pack” we comment that our flock is becoming very diverse.
And with that I wish you all a Beautiful and Blessed Easter. Until next time 🙂
I’m still excited about my spearmint soap, but after taking it out of the molds I realized that maybe I should have done a little research before making this recipe. I’m beginning to think that my middle name should have been “Experiment”, because I seem to do a lot of that. Although the soap is not fatally flawed, and only the appearance of the soap will suffer, I did make one mistake that can and will be corrected in future batches.
Spearmint Soap
This picture shows some brown spots that developed on the soap. While I was certain the spots were caused by the spearmint, I was a bit perplexed about why the brown spots only occurred in some areas and why some of the spearmint retained its green color. I decided to do a google search to find out what others have experienced when adding spearmint to handcrafted soap. The first site I found, described this effect as bleeding. I found out that bleeding is when the color from an embedded object leaches of into the surrounding area. I found out that many herbs can have this effect, and to varying degrees, but spearmint is one of the worst.
The next website that I came across actually told me how to prevent this from happening. It said that the cause is the actual color coming out of the leaves when it is submerged in the wetness of the soap, and if you make a tea with the herbs first, the color will leach out into the water (tea). Then the leaves can be added to the soap. That answered my question. When I made my soap I added the spearmint leaves that I had used to make the tea with, but since I wasn’t sure I had enough, I decided to add some dry leaves as well. I have concluded that the dry leaves that I added are the ones that bled into the soap, while the leaves from the tea remained green. Since this is simply an aesthetic problem, Dom and I are looking forward to using these bars of soap.
The good news is I can detect a slight minty smell to this soap.
Moving Day
2 Weeks Old
The chicks seemed to be getting quite curious about the world outside of their brooder. Every time we would walk up to the brooder they would crane their necks looking up at us. Since the weather has warmed significantly for the near term forecast, we decided Tuesday was moving day.
My husband brought the hutch out of the back shed and assembled it while I was busy in the kitchen. “Movin’ On Up” the theme song from the Jefferson’s kept running through my head. https://www.youtube.com/watch?v=FHDwRECFL8M I would change the words to “Movin’ on out, to the deck” but the tune repeated itself over and over in my mind. I probably could have stopped this by turning on the radio, but it was a nice day, I was in a good mood, and it really wasn’t bothering me, in fact I thought it was kind of funny. It turned really funny when I was helping my husband carry the brooder out the deck, and he started singing “Movin’ on up…” Like minds.
The heat lamp was moved into their new home. As were their food and water dishes.
They seemed very curious about everything, but settled in nicely.
Their play house was also moved with them.
My camera battery died before I got to take a picture of the roost my husband installed for them. (Roosters aren’t the only ones who like to roost) I also did not get a picture of the canvass that drapes the hutch to protect them from the elements. It is just a large piece of canvass that we lay over the top of the hutch, it drapes down the sides and front. When the chicks need the warmth we wrap the hutch with the canvass just like wrapping a Christmas present, and we secure the canvass with clips.
The “Babies” seem very content in their new (but temporary) home, Scout can now see them at eye level, and don’t be surprised if, on the evenings when the weather is nice, I tell you that we sat on the deck and watched “Chicken TV”.
Maple Syrup
Sunday and Monday were our last day for collecting sap. Since the sap was still running clear we may have pulled the spiles a little early, it may have been only a few hours or maybe a few days prior to the time the sap would become cloudy. The nighttime temperatures will not be below freezing at least for the next week and the buds on the Silver Maple trees are getting ready to pop open.
Our big consideration was the extreme amounts of time and energy that were needed to turn the sap into syrup, and decided that we had done enough. Since February 20th, when we first tapped the trees, until now, my husband spent 5 full days (9-12 hours each) out at the farm cooking sap, getting the fire going then continually adding wood to the fire to keep the sap boiling, stirring and watching the steam roll off, as the water boiled out, then adding more sap to the pot. At the end of the day he would bring the sap home and we would spend another 1 1/2 to 2 hours cooking the sap into syrup.
I don’t have exact numbers on our total yield for the season. My best guess is between 5 and 6 quarts of syrup.
My husband and I agree that it was a great experience and having homemade, self-harvested maple syrup is greatly rewarding. Some of our thoughts about this experience are that it was not a steady year for maple syrup, in our area, since the extreme weather changes over the last couple of weeks prompted the sap to stop and start flowing several times. We found out that our Silver Maple trees at the farm had greater sap flow than the Sugar Maples that we tapped. In fact, last week when the silver maples were flowing well and the sugar maples were not flowing, my husband moved all of the taps to the Silver Maples. We found out that The Silver Maples make a wonderful syrup. We observed that the color of the syrup seemed to get lighter over the course of the season, with our first batch being the darkest and each batch slightly lighter in color. Thankfully it is a short season for making maple syrup and not a year round job.
A Bonus Picture
This squirrel enjoyed the day in the tree. Apparently too nervous about our (and the boys) presence to venture down.
I don’t know about other writers but it takes me a while, anywhere from couple hours to a couple days, to write a blog post. I’ll write some, then go back and read and edit and stop to do other things or just collect my thoughts, then I’ll write some more and reread and edit and you get the picture. It seems to happen quite often that I’ll be working on one post when something else comes up, and I decide to write about that instead. At this point I have no fewer then a dozen drafts saved, potential posts that are started but just haven’t got completed and published yet. I suspect that some will get finished in the future, some may be deleted, and some of the thoughts may be incorporated in other post.
With several things on my mind this morning, I just realized that life is happening faster than I can write. (This is probably why I’ve never been able to keep a journal for very long.) Todays post we be about various things.
In Like A Lion
It’s hard to believe that today is March 1st already. See what I mean about life happening fast. Today is actually March 2nd. Still hard to believe. Whichever day it is, March did arrive and in our area it came in like a lion. I wouldn’t describe it as a raging or even roaring lion but the lion was not sleeping last night either, it was perhaps was just resting or playfully romping. We got a decent amount of snow, but as seems to be the case lately, not as much as the weather forecasters predicted. Probably the most accurate weather forecast that I heard yesterday was given by the radio DJ that said “were gonna get a lot of snow”. Since it was snowing pretty hard at that time it was a safe bet that he was right. Looking at flat surfaces outside it looks like we got about four inches, but since it was a light fluffy snow and the wind was blowing, some areas on the ground may have eight inches while others only have a couple. The “lion” may have caused adverse travel conditions, and shut down schools and senior centers, but I am not aware of any power outages or actual storm damage in our area. The “lion” did give us the opportunity to play in the snow a little today. 🙂 My big hope now is that when “March goes out like a lamb” it is not an unruly lamb.
Maple Syrup Update
One thing I didn’t realize about sap flow, and I don’t know how typical this is, was how it will stop and start again. Since the temperatures have been so unstable we have had the sap flow for a day or two, then stop for several days, then flow for a day or two, then stop again. We had a whole week between the first sap boiling and the next time we had sap to boil, but this past Sunday, with temperatures topping out near 60 degrees, was a great day to be at the farm boiling sap. While my husband was there all day, I joined him there for a few hours and took some pictures of the process that I did not get during the last syrup making.
Cooking Sap At The FarmCooking Sap
You can see in the above pictures that the sap has boiled down some.
The next series of pictures shows how the sap will foam up and boil over if the fire underneath is extremely hot.
Stirring the pot and reducing the flame brought it back down.
The next picture shows that were getting close to the point where we will finish it off on the stove in the house. It has cooked way down and is turning brown. It also tastes sweet.
Cooking Sap
When we brought the sap home the first step was to filter it. To do this we used a jelly bag set inside a flour sifter. It may not be a professional method, but it works. We did set the filter up on two small glasses to give the sap room to drain into the pan.
Filtering Sap
We then followed the same process that we did previously, boiling the sap until it became thick and reached 219 degrees Fahrenheit on the thermometer. Instead of bottling it immediately like we did last time. We let the temperature drop to 200 degrees and filtered it again.
Last time we did not filter it after boiling, and we ended up with sand in the bottom of the jar. I did a little research and found out that the sand is formed during the boiling process, so in order to have clear syrup it must be filtered after the boiling is complete. This time we do not have any sand in it.
Maple Syrup
My husband estimated cooking about 50 quarts of sap and our yield turned out to be these (10) 4 ounce jars of syrup, equal to 1 and 1/4 quarts, so our ratio of sap to syrup was 40:1. And the flavor is oh so good!
Sharing The Kitchen
With Sunday being such a nice day the sap continue to flow and my husband spent yesterday, again, cooking sap at the farm, while I spent the day at home peeling garlic to dehydrate. Once I got the approximately 3 lbs. of garlic peeled. I realized that Dom would be bringing syrup home to cook this evening. Knowing that once I put the garlic in the dehydrator the smell of garlic would permeate the house, I decided that I would wait. I don’t know if it would happen, but I didn’t want the syrup to pick up the smell and perhaps the flavor of garlic. Garlic flavored syrup just does not sound appetizing. I put the peeled garlic in a zip lock bag freezer bag and put it in the fridge for the night.
We cooked up some of the sap last night and the rest will remain in cold storage until we are ready to cook it. Today the garlic is in the dehydrator. It should be finished by tomorrow morning.
Chick Update
The chicks are doing well.
Getting their pin feathers.
Enjoying their playhouse.
And making new friends.
Others Enjoyed Sunday’s Weather As Well
The bees were out on Sunday.
The Chickens enjoyed the weather as well.
I don’t know if the pond ever completely froze over this year.
Widely because the windmill has done it’s job.
You can’t tell from this picture but the windmill was spinning.
That’s All Folks
At least that’s enough for today. Until Next Time 🙂
We have several neighbors and family members who, like us, have a great appreciation for farm fresh, free range eggs. A couple weeks back, the hens started laying more so my husband put the word out to some neighbors that we had some eggs for available. Immediately we had requests for more eggs than we had on hand. At that point we decided that we should add some laying hens to our flock this year.
I wanted to get an early start with the chicks, so when we found last week that the local farm store had chicks we decided it was time to get ready. Over the weekend my husband brought the brooder (stock tank) inside and took the chick water and feed dishes out of storage. Tuesday morning, before we went to the farm store, he brought out the heat lamp and put wood chips in the brooder for bedding.
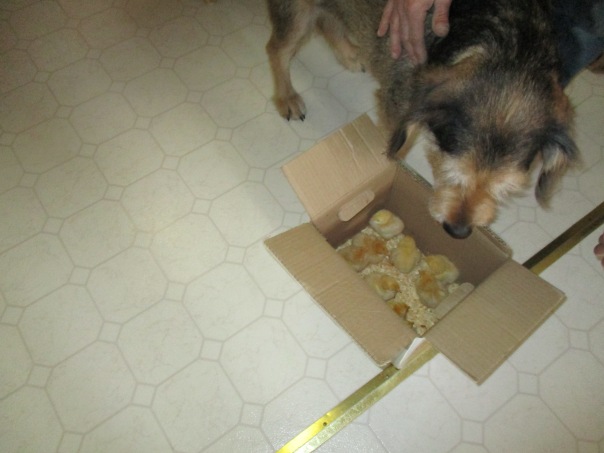
Scout and Trooper Welcoming Our New Arrivals
Scout and Trooper have been through this with us a couple times before, and Scout especially loves baby chicks. We have taught him that those are “his babies”. When we got home from the farm store the boys were eager to see the chicks.
You might think it is risky letting the dogs get so close to the chicks, and yes to some degree it is, but the boys have learned that they have to “be nice” to their “babies”. Sometimes the chicks get nosed around a little or even get doggie (tongue) bath, but we have yet to lose a chick because of the boys.
Scout Welcoming Our New Chicks
We planned on getting more Silver Laced Wyandotte’s and we compromised on getting nine pullets. When we got to the farm store we discovered that the Wyandotte’s both silver and gold laced were completely sold out. So we decided to get Buff Orpingtons.
Although Buff Orpingtons were not our first choice they really are a nice breed. Of our adult chickens I think they are the friendliest, they lay consistently large or extra large eggs, and of the three breeds we have (including Rhode Island Red and Silver Laced Wyandotte) the Buffs are the only ones that have gone broody and raised chicks. They do make good mothers. I am not sorry we got the buffs.
Brooding Buff Orpington Chicks
Chicks In Their Brooder
For the first couple weeks or at least until they get their feathers, their brooder will be indoors and Scout and Trooper will come running whenever we tend to the chicks. We put a step stool next to the brooder so Scout can put his feet up and look over the side. Trooper is tall enough to just look over the side.
After they get all of their feathers and the weather is good enough we will move them to a hutch on the deck where they can still have the heat lamp for warmth, but they will have more space.
The Chicks Have A Play House
It didn’t surprise me, on day two of having the chicks here, when my husband took this empty “Silk” carton and made them a play house. In fact I’m more surprised that he hasn’t made them a jungle gym with a tire swing and a seesaw… Yet. He’s such a good chicken daddy.
As for me I am enjoying hearing “peep peep peep” and “peck peck peck”. It makes me think spring 🙂