I have been using some of my yarn stash to make these, so finding complimentary colors that work is a challenge.
This is my precious granddaughter Addy modeling the hat I made for her,
and my beautiful, great-niece, Kenzie wearing the hat (with curlicues) that I made for her. You can see more of this style hat in this post.
While crocheting all this has been lots of fun, I have to admit that I am really anxious for the nice weather to get here, when I will trade in my crochet hook for garden tools. Bring on spring!
A while back I wrote about making Aloe Soap with Yogurt and since my husband and I have recently tested this soap I wanted to share our thoughts on it.
Before I do I find it necessary offer this prelude. When our daughters were growing up we had some pretty strict rules that they had to follow. These rules served several purposes: help maintain order, live within a budget, teach the girls responsibility and self discipline… One of the rules was that their showers were limited to eight minutes. We generally find that eight minutes is an adequate amount of time for us to get in, wash, rinse and get out. We bought a kitchen timer to keep in their bathroom. They were required to set the timer for 8 minutes and when the timer went off they had to get out of the shower. It was done on an honor system, but if my husband or I were around when they got in the shower we would occasionally set the timer in the kitchen for 8 minutes to see if they were cheating.
It’s been about two weeks now since I first showered with the new Aloe Soap . I was thrilled with the outcome. The lather was rich, bubbly and creamy, it rinsed off well and left my skin feeling soft and clean.
After I had used this soap for a few days I gave my husband a bar. I didn’t tell him what I thought of it. I just asked him to let me know what he thought. After his shower he told me that he loved the soap. Several (at least four probably more like six) times throughout the day he repeated to me how much he loved the soap. “That lather is amazing.”
The following morning after breakfast my husband said, “I’m afraid to get in the shower.” His statement caught me off guard and I asked him why. “That soap feels so good I don’t think I will want to get out. I might stay in there for a couple hours until I use up the whole bar.”
“Oh, no!” I laughed. “Eight minutes.”
He said he had already considered finding the timer and setting it. (I’m sure none of the girls took it when they moved out.) He also had wondered, if he did set the timer, if he could/ would cheat.
I found this pretty funny and I thought it was a wonderful testimony for my soap, but knowing that the girls read my blog could I really I confess his temptation to them and the whole world?
He didn’t really get out the timer, and I don’t know whether he stuck to eight minute showers, but I did not notice his showers taking longer than normal. A few days ago he announced to me that the bar lasted him for six showers which is about average for him.
As you now know I did decide to “come clean” because even if the girls try to hold this over his/our head the worst they can do is razz him about it since they are now paying for their own hot water. Hmm, I wonder if they will use this soap.
I first wrote about this topic in January of 2016 but I tried some new methods this year and thought I would give you an update.
Peeling the garlic is the longest part of the process and is probably the reason most people will choose to buy garlic powder rather than make their own. Peeling garlic is not a hard job, if fact with this handy silicone garlic peeler, that we highly recommend, it is so easy that a child can do it. However, peeling large amounts of garlic to dehydrate is still a big and seemingly never ending a chore.
In a quest to find an easier or at least quicker way I did an internet search. I found a few methods that looked promising so I tried a couple. I first tried putting the garlic in a bowl and placing a second bowl on top and shaking it. The video made this look so easy that I figured I could have all my garlic peeled in no time. My attempts at this were futile. I ended up with one or two cloves partially peeled and the rest of the peels clung tight to the cloves. 😦 I really don’t think it was anything that I did wrong or that these videos are fake. I suspect it has everything to do with the variety of garlic that they were using verses the varieties of garlic that I was using. Yes, in case you are wondering there are many (I’ve heard as many as 600) different varieties of garlic. While I can’t endorse this method of peeling garlic I would say it is probably worth a try before you move on to something else. It might just work for you.
The other method I decided to try was blanching the garlic. I didn’t want to cook the garlic so rather than put it in boiling water I decided to immerse it in hot (probably about 180 F) water for 1-2 minutes I then put the cloves in a bowl of cold water until I was ready to peel each one. This method produced better results in that once the skin was pierced or broken it easily slipped off the clove. I pierced the skin using a paring knife while cutting off the root end. Even though it seemed easier I’m not sure that it was any quicker than peeling each clove with the handy little garlic peeler shown above. It is also worth mentioning that I would only recommend this method if you are peeling a large amount of garlic.
Another thought came to my mind as I was writing this and it may just be the answer you/we are looking for – purchase several of the silicone garlic peelers and get the whole family or even the neighbor kids involved. Many hands make light work. (See why my kids moved out. LOL)
There was one other thing I did differently this year. Last year I wrote that I used the slicing blade in my food processor to slice the garlic. For some reason my slicing blade is missing so I decided to use the shredding blade. This actually turned out really well. It was difficult to spread the garlic evenly on the dehydrator trays but even in small clumps the garlic dried in about 1/2 the time as it did last year.
Lastly I will leave you with a warning. Dehydrating garlic in a food dehydrator produces a strong and somewhat overpowering garlic odor. This is a job that is best done in outdoors, in an out building, or in a closed off room with an exhaust fan.
I hope you find these tips useful and if you have any tips to share please leave them in the comments section below.
I wanted to make a fruity dessert yesterday so I decided on an old family favorite. I remember my mom making this when I was a teenager and then telling me the recipe when I was a young mom. It’s such an easy recipe I don’t know if Mom ever had it written down, but I know I never did.
This has got to be one of the simplest and most delicious desserts you will ever bake so here is the recipe.
Dump Cake
1 can cherry pie filling
1 can crushed pineapple
1 yellow or white cake mix
1 stick butter melted
Directions – Spread the cherry pie filling in the bottom of a 13×9 inch (33×23 cm) pan. Pour the crushed pineapple evenly over the cherry pie filling. Sprinkle the cake mix evenly over the pie filling and pineapple. Pour the melted butter over the cake mix as evenly as possible. Bake at 350 degrees F (176.7 C) for 30-40 minutes until top starts to brown.
Since I didn’t have any canned pie filling or pineapple on hand, I decided to change the recipe. What I did have was some of our home grown fruits that I had frozen when they were in season. I started with about 4 cups (946.35 grams) of frozen strawberries and 1 1/2 cups (354.88 grams) of frozen rhubarb. I put the strawberries and rhubarb in a sauce pan and added 1 cup (236.58 grams) of sugar and 1/3 cup (78.07 grams) of corn starch. I slowly heated this until it came to a boil and became thick like pie filling. I then poured this into my 13×9 inch (33×23 cm) pan, topped it with a yellow cake mix and melted butter, and baked it just like the recipe above. This dessert can be eaten either warm or chilled. It is delicious either way.
While this may not have been as simple as the original recipe the home grown fruit made it extra delicious.
Note to my friends and readers around the world – I have added metric conversions by using online conversion charts and can only trust their accuracy. I have also rounded the numbers up to the nearest 100th and I am not sure if this gives you a close enough measurement. This recipe does not really need to be exact, but if the measurement does not seem right to you might want to do you own conversion.
It doesn’t seem like a whole year has gone by since we last tapped maple trees and made our maple syrup. Maybe that’s because it hasn’t really been a whole year. While I didn’t remember the exact date that we tapped trees last year I was able to review the post I wrote about it, and I discovered that last year we tapped the trees on February 13th. Last year’s sap flow was considered early and we read that some syrup producers actually missed the season because the were not expecting the season to come so soon.
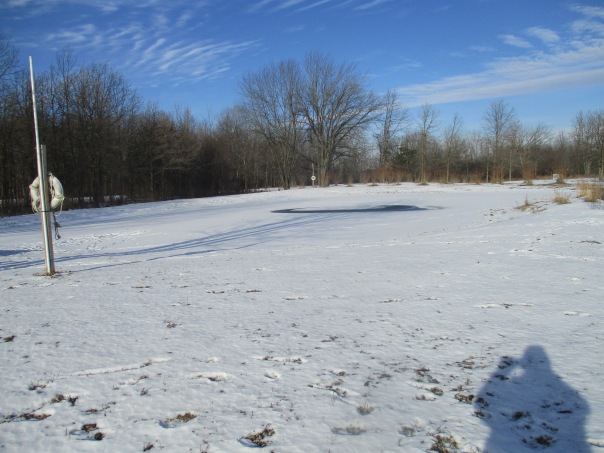
It was only January 20th according to the calendar but nature doesn’t necessarily go by the calendar. Despite the brutal cold we have had this winter we had been watching the forecast and preparing for the sap season to start. This is only our third year making syrup, so we don’t have much experience to go by, but since temperatures were forecast to be in the high 30’s and low 40’s Fahrenheit (between 3 and 7 degrees Celsius) 7 out of the next 10 days we thought this might be the right time. My husband thought that it would be a good idea to do a few test taps to see if the sap was flowing. So we took supplies for four taps to the farm.
January 20, 2017
The day was very reminiscent of the day we tapped last year. The sun was shining, there was still a thin layer of snow on the ground, and the pond was mostly still frozen.
Happy Hens
The chickens were happy to be out scratching , pecking and even dusting themselves.
My husband and I worked together, taking turns drilling the holes and setting the taps.
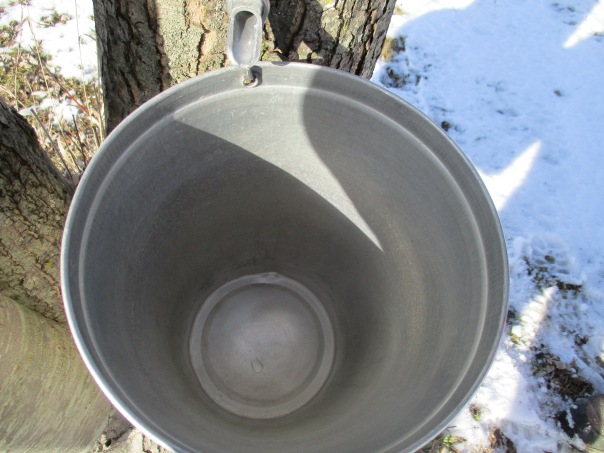
First Drop Of Sap
When the sap began running within seconds of being tapped we knew we were on the right track. After setting the first four, we went home, gathered the supplies and returned to set the remaining 13.
A couple days after tapping the trees the high temperatures again stayed below freezing so no sap was flowing. Then we had a couple more day where temperatures reached into the 40’s F so the sap began to flow again. By Friday my husband determined that he had collected enough sap to make syrup. We would cook it Saturday.
My husband had the cooking station set up in the driveway. Because cooking sap produces so much steam cooking it the house would be a horrible mistake, and we are not equipped with a sugar shack so we do it much the way we imagine our ancestors would have – outdoors over a wood fire.
The fire pit is simple – made of two layers of concrete blocks on three side
He spaces the concrete blocks so that the shallow stainless steel pan sits on the edges of the blocks. We build the fire within the blocks and continually feed wood into it from the open side.
We used a mixture of hardwood limbs and logs that we had cut on the farm and some scrap lumber my husband had picked up from the local sawmill. We began cooking the sap around 11:30 A.M. and by 4:30 P.M. we had reduced the estimated 23 gallons of sap to the point that we could finish it on our kitchen stove.
Before cooking it on the stove we poured it through a sieve to remove some of the ash that was floating in it. I then brought it back to a boil and continued cooking it until it reached 7 degrees above the boiling point on the candy thermometer 219 degrees F.
Filtering the sugar sand out of the syrup is something that we have struggled with the past two years, so I decided to pay close attention to the temperatures while doing this. I let the syrup cool to between 180 and 190 F. For a filter I used one layer cheese cloth with one layer of felt placed on top of it. I placed the two layers together in my canning funnel then poured the syrup through the fabric lined funnel directly into the jar.
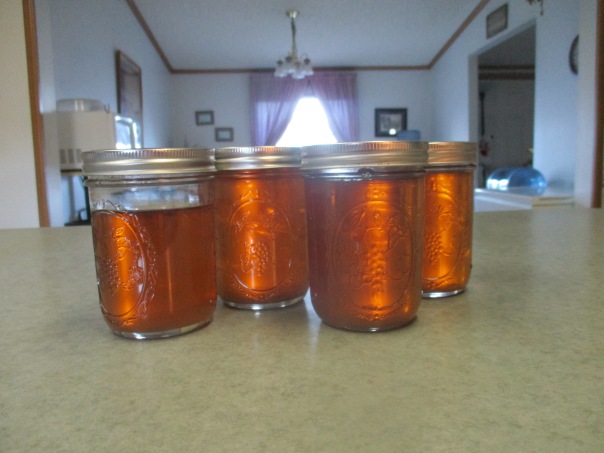
After pouring each jar I needed to change the filter, so I put the pan of syrup back on the stove over a low flame so I could maintain the proper temperature. The syrup flowed easily through the filters. I sealed each jar as soon as it was poured. We ended up with just a very small amount of sugar sand in the bottom of the jars. There is no harm in eating sugar sand as it is said to be made up of calcium salts and malic acid, so filtering out this sand is purely for aesthetic reasons (it does look like muck in the bottom of the jar).
Even though once sealed the syrup should not spoil, I like to bottle the syrup in wide mouth mason jars, because as long as I leave the proper amount of head space the syrup can be stored in the freezer. We ended up with nearly four pints of beautiful, sweet maple syrup.
What the rest of the maple syrup season will bring is anyone’s guess. Our weather forecast for the next 10 days shows daytime temperatures below freezing for all but one day, so we are not expecting the sap to run again for a while. When the temperatures do warm again, if the trees bud out quickly the sap will turn milky and is not good for making syrup, so we are grateful that we tapped the trees early and at least have some syrup this year.
I also made an interesting observation as I looked back at my post from last year, “The Sap is Flowing and the Hens are Laying”. Again this year, as we tapped the maple trees we noticed that the hens have began laying more eggs. For five or six weeks we were getting an average of four eggs a day, this was enough to keep us in fresh eggs through the winter. On January 20, the day we tapped trees, we collected six eggs, then over the next week the amount increased so that we have collected 12 eggs each of the last two days. I honestly expected that the increase in egg production was more related to the number of hours of daylight and similarly to last year would occur in the middle of February. Perhaps it is more about the warmer temperatures we have been enjoying, I’m really not sure, but I do think I will attempt to track these two events in future years to see if they continue to coincide.