Category Archives: soap

Rendering Beef Tallow

Tallow is an ingredient that is commonly used in soap making and if you are buying commercially made soap, tallow is likely an ingredient. You won’t see tallow listed as such on the package. As an ingredient it will be listed as sodium tallowate, which is the name for soap that has been made by combining tallow with sodium hydroxide (lye).  This Wikipedia article explains other uses for tallow.  https://en.wikipedia.org/wiki/Tallow#Food

Unlike coconut oil, olive oil, lard and some of the other oils used in soap making, tallow is not readily available in most grocery stores. When I first began making soap I used oils that were readily available and while I could have ordered tallow online or perhaps sought it out at a butcher shop, I never did. It wasn’t until we started buying our beef from a local farmer that I began using tallow as an ingredient in some of my soap.

We had ordered a quarter of a cow. When I called the processing facility to tell them how I wanted our beef cut up, I asked if I could get some tallow as well. At that point I had not done all of my homework, I didn’t know that the fat that I wanted was called suet before it was rendered, so the lady did correct me. I did know that I would have to render the fat before it would be suitable for soap making.

When we picked up our meat order I found that the suet was a large chunk of fat wrapped in a large plastic bag. I put it in the freezer until I was ready to use it.

IMG_3390
Suet


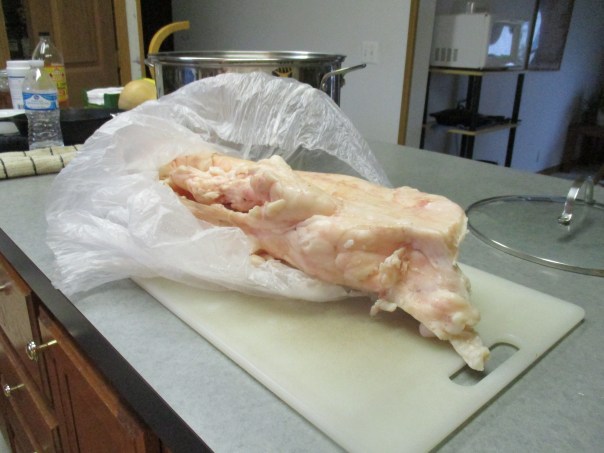
I had read several tutorials and I realized that in rendering the suet into tallow the objective was to melt the fat in order to separate out any parts that were not pure fat.

I’ll share with you the method that I used and have continued to use ever since.

I started by taking the suet out of the freezer and letting it thaw for a while. It seems that it is easiest to cut while it is still cold but not frozen. I cut it into fairly small pieces. The smaller they are the faster they will melt or the less cooking time it will take. I put the suet pieces in my large stock pot and added enough water to cover it. I put it on the stove and brought it to a boil. Since I did not want the water to cook off I put a cover on it but I tilted the cover so that some of the steam could escape.

IMG_3391
Rendering Tallow

It took a few hours of boiling before most of the fat chunks were completely melted. At this point I dipped in with a sieve and took out some pieces of meat that would obviously not melt.

I then let it cool. Since outside temperatures were in the 40’s (Fahrenheit) and lower, I decided to let it cool outside overnight. The next day the tallow had hardened and floated to the top. The water and some remaining meat particles were in the bottom of the pan. I had to break through the layer of tallow to drain the water off. I did this outside because I didn’t want any tallow particles clogging up my drain.

When I removed the tallow from the pan the bottom was covered in a layer of mushy grey stuff. I scraped off this layer and discarded it. My tallow was not yet as clean as I wanted it so I put it back in the pan, covered it with water and repeated the process.

The tallow did not take nearly as long to melt as the suet did so my cooking time was greatly reduced. After letting the second rendering cool and harden, I again scraped the mushy stuff off the bottom and decided to repeat the process once again.

After the third rendering the tallow looked clean and pure. I placed it on a tray lined with paper towel to dry and patted the top and sides dry with paper towel as well.

IMG_3406
Tallow

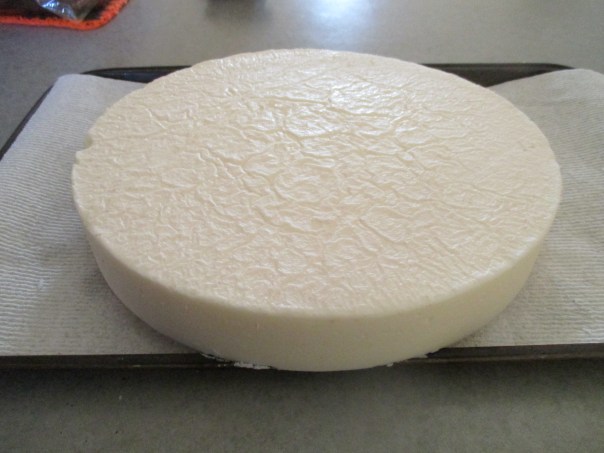
I then cut it into chunks, but because it is very hard it cracks rather than cuts, and placed the chunks in a freezer bag. I then store the tallow in the freezer until I am ready to use it.

Tallow is not an essential oil for soap making, and I realize there are individuals who prefer not to use animal fats in their soaps, but tallow does make a hard bar of soap and adds a creaminess to the lather. For me the greatest advantage of tallow is that it can be locally sourced, unlike coconut oil, olive oil and many others that must travel hundreds, if not thousands, of miles to arrive at my home and be turned into soap.

🙂 Until next time…

Home Made Laundry Soap

I was just mixing up a batch of laundry soap and thought I do a quick post about it. There are many recipes on the internet for homemade laundry detergent. They usually call for grated bar soap such as fels naptha, borax, and washing soda, some add oxyclean and or essential oils for fragrance. The main difference in my recipe is that I use homemade bar soap.

The bar soap that I make for laundry soap has only 3 ingredients. They are coconut oil, water and lye. Out of all of the oils used in soap making coconut oil is most known for it’s cleansing ability. This soap certainly could be used for bathing. My husband likes it but I personally find it to be a little drying. I am sure that is because of it’s cleaning power. I really like it for laundry detergent though. I make a liquid detergent dissolving 1/2 cup each – grated soap, borax, and washing soda in about 2 quarts of very hot water – not boiling. Once all of the ingredients are completely dissolved I add another two quarts of cooler water then I pour it in an old detergent jug. I always shake the jug before using it incase the ingredients have separated, but that doesn’t seem to be a problem at these proportions. This recipe cleans our clothes at least as well as any commercial detergent that I have used in the past, and there is no need for fabric softener, as our clothes come out of the dryer nice and soft.

For anyone thinking about making bar soap using coconut oil as the only oil I will give you some advice.  This recipe will make a very hard bar of soap and it hardens up very quickly. If you want this soap to end up a particular size or shape, mold it that way. Do not expect to cut this into nice looking bars once it has set up. Attempts to cut this soap after it has hardened will result in the soap cracking into any size or shapes it desires.


Bath Day For The Boys

One 90 lb. Scout + one 120 lb. Trooper on bath day = one big job. What makes it somewhat easier is the fact that they are well behaved when they get their bath. Yesterday when I    announced to the Boys that they were going to get a bath they both came into the bathroom and looked at the tub. I still needed to get things set up for them, so I told Scout he had to wait a few minutes. He laid down to wait.

IMG_2546
Scout waiting for his bath.

We used to give them both their bath’s in our garden tub. My husband hooked a shower hose to the tub faucet and this works well.

100_0377
Bath time for Scout and Trooper

We usually bathe them one at a time, but one time my husband actually had them both in the tub together.

Trooper still gets his bath in the tub, but Scout’s advanced age prevents him from jumping into the tub like he used to. Nowadays I remove our glass shower doors so that Scout can just step into the shower. I kneel on the floor beside the shower and wash him up. He loves the attention and he loves it when we tell him he is a “clean puppy”.

A few years back, after I began using my homemade soap for washing my own hair, I decided to try using it on the boys. Buying dog shampoo can be expensive, the highly perfumed fragrance of these often has adverse effects on my sinuses, and getting these shampoos completely rinsed out of the boys coats was a nightmare. Using the soap, on the other hand, there are no added fragrance. It provides a lather that penetrates even Trooper’s extremely thick coat and under coat yet it rinses out nicely. Yesterday I used Aloe Soap but I sometimes use my Hair Care Soap that I use on my own hair.

IMG_2548
Scout and Trooper – the afterbath

After their bath my husband had them lay on the blanket to dry and he gave them a nail trim.

Last night as I petting each one and saying good night I noticed how exceptionally soft Troopers coat was and even Scout’s wirey hair had a softer feel. Indeed, Don’t Eat It! Handcrafted Soaps are good for the whole family, including the dog.


Hint of Mint Soap (New and Improved)

“You have to write a post about your mint soap,” my husband has said this to me more than once in the past week. I gave him a bar of my latest batch to test last week and you can probably guess, he likes loves it.

I first experimented with adding mint to soap last year. https://donteatitsoap.com/2016/03/06/new-soap/  The results were a nice soap but not really what I had hoped for. About two months ago I made another batch of mint soap and decided to boost the mint properties by using mint infused oils. I infused my dried spearmint leaves in water as I had in the previous batch. In addition I used sunflower oil that had been infused with spearmint and I put a tea bag with dried mint leaves in my oil mixture as they were heating and then cooling before being added to the lye mixture. I removed the tea bag before I blended the lye mixture with the oils. After mixing the oils and with the lye mixture I also mixed in the mint leaves that  had been infused in the water. The soap was in the molds for two days before being cut into bars and then it cured for six or seven weeks before we tested it.

I tried the new recipe first because my husband was still using up another bar of soap. My first impression was nice bar of soap – good lather- rinses off well. After my second or third use I began to detect a light mint scent. I also noticed a light refreshingly cool feeling on my skin as I rubbed the soap on. On the first day my husband showered with the soap he said, “it’s a nice soap.” When I asked him if he could smell or feel the mint he said, “Honestly, no.” The following day, after his shower my husband came to me,  “I really like the mint soap,” he said. “I could smell the mint and it feels really nice. You did a good job. You better blog about it.”

The fragrance and cooling effects are pleasantly subtle, the lather is nice and this is a hard bar of soap that will last a while and it is husband approved. Anyone interesting in purchasing this or any of my other products that can be found in my store can email me at ruth20012001@yahoo.com and put soap in the subject line.


Two New Soap Recipes

I am really excited about the two new soap recipes I made this week. The soap I made on Monday was inspired by the dandelions that are popping up everywhere screaming “spring is here.” I decided that those yellow beauties might just make a nice soap.

Usually before I try something new with a soap recipe I do an internet search to see if others have done similar. Artisan soap makers are a creative bunch and it seems there is not much they haven’t tried and wrote about. I did indeed find several sites with dandelion soap recipes, stories, and for sale. I do not use other peoples recipes but I like to get an idea of how others have used particular ingredients, what the results were and if there is anything major that might go wrong.

By this time I have learned that when adding botanicals to cold process soaps you will very rarely capture any fragrance and I have no way of testing to see if any potential therapeutic benefits from them survive the process. The most I could hope for is to capture some of the cheery yellow color. Hoping to double up on any benefits I infused both the water and the oils with dandelion flowers. I decided to add honey as well.

This recipe is now out of the molds and has a deep yellow color. It still has to cure for about six weeks and doubtless the color will change as the soap cures. I’ll let you know how it turns out.

Todays soap experiment is maple. When I did my internet search for maple soap I found that maple syrup is often used as an ingredient in handcrafted soap. My plan was a little different. When my husband was collecting sap to make syrup this spring I asked him to save me a couple of quarts so I could make a batch of soap with it. “Are you sure you know what you are doing?” he asked. I explained that I plan to use the sap in place of the water in my soap recipe. He graciously obliged my request and I have kept the sap in the freezer waiting to be turned into soap.

One morning when we were having our homemade syrup on our pancakes and I looked at the sugar sand that had collected at the bottom of the jar and wondered about using it in soap. Will the sand particles remain sand or will they dissolve during the processing. I remembered reading that it is mostly composed of calcium salts and malic acid. It is not harmful to eat and upon further research I learned that those ingredients can be beneficial for skin care. Again I can’t make any claims about my soap providing these therapeutic benefits because it is questionable whether they survive the soap making process. The sand in that jar was gone before I had a chance to tell my husband that I wanted to save some for making soap. We had a few more jars with sand at the bottom, so I opened one this morning, poured most of the syrup into an empty jar and put it in the refrigerator for future breakfast. The sand and a small portion of the syrup that was left in the bottom of the jar were added to my soap.

The maple soap, if it turns out well, will definitely be a seasonal soap and I expect the sweet dandelion soap will be as well. Although they won’t be ready for 6+ weeks you can contact me by email ( ruth20012001@yahoo.com) if you are interested in purchasing either of these soaps. 🙂