Making Tomato Sauce

I have been asked several times by friends how I make tomato sauce and I usually answer “cook it, cook it, cook it, and when you think it is ready, cook it some more.” Making a thick tomato sauce takes lots of time.

There is, however, much to do before you get to the cooking part and that is what I want to address today. To start with there are many, many varieties of tomatoes and although I do like to start with a paste tomato, Amish paste or roma’s, you can use any type of tomatoes for making sauce. Along with Amish paste I use any tomatoes that are ripe and will not be eaten fresh in the next day or two. I will even throw cherry tomatoes into the mix rather than see them go to waste.

In addition to taking a lot of time to make tomato sauce it also takes a lot of tomatoes to make sauce. It takes approximately 5 or 6 lbs. of tomatoes to make 1 quart of tomato sauce. So don’t be shocked when that shopping bag full of tomatoes ends up providing only a couple of spaghetti dinners for the family.

Now before you “cook it, cook it, cook it” you must first turn those tomatoes into juice and the are many ways you can accomplish this. I will share some of the methods I have used over the years including the steps involved and equipment required. If you have never made your own tomato juice or sauce keep reading.

When I first started making tomato sauce I did not have some of the equipment that I use now days so I used what I had on hand to juice the tomatoes – a blender. With any of these methods I start by washing the and any tomatoes that have rotten spots are discarded. When using the blender after washing the tomatoes I remove the skins by blanching the tomatoes. This is done by putting the tomato in a pan of boiling water for about a minute then immediately putting the tomato in a bowl of cold water. For this step I placed the tomatoes in a blanching basket or a wire basket that sits inside the pan of boiling water, then to remove the tomatoes from the pan I simply lift the basket by the handle and dump the tomatoes into the cold water. If you don’t have a blanching basket you may be able to use a metal colander or even just put the tomatoes in the boiling water and lift them out with a slotted spoon.

When the tomatoes are cool enough to hold I cut out the core of the tomato with a paring knife and then the peel of the tomato will slip right off. I then cut the tomato in half horizontally and scoop out (some of) the seeds. I don’t worry too much about removing all of the seeds because my family really doesn’t mind having seeds in their tomato sauce.

I then cut what is left of the tomato into small pieces and put it in the blender and blend it into juice. At this point I could of pour the juice through a sieve or fine mesh strainer to remove any seeds that remain. The juice is now ready to be cooked into sauce.

Over the years I have acquired some equipment has made this task easier. The first piece of equipment is this simple and inexpensive food mill. I’m sure I paid less than $20 for it several years ago when I purchased it.

IMG_3267

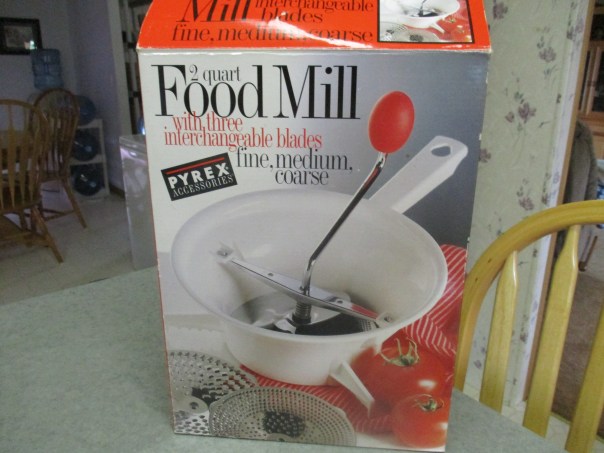
This food mill will sit on top of various size pans or bowls but must be held in place with one hand while turning the crank with the other hand.

When I use this food mill I wash the tomatoes, cut out the core, cut them in quarters and cook them until they are soft. Once they are soft this food mill will easily remove the skins and seeds and turn the tomatoes into juice.

IMG_3268

I use the medium blade and it does tend to get plugged up quickly. When it gets plugged up I need to scrape the pulp off the bottom of the blade (the pulp is part of the juice) and empty the seeds out of the top part of the food mill. The seeds are fed to the chickens later.

IMG_3269

While this method does not require blanching and removing the skins, it does take time to cook the tomatoes before juicing them. Once the tomatoes are cooked the skins break down easily and are mostly turned into pulp adding to the thickness of the tomato sauce. I tend to use this method when I am working with smaller batches.

When I am working with larger batches – a bushel or a shopping bag or more full of tomatoes, I use another piece of equipment that I have acquired in recent years.

It is another type of food mill or juicer. I actually have two of these, one was given to me by my mother and one was given to me by my father-in-law. Both of the models I have are very old and also very functional. Similar models are still produced today but they are quite pricey.

IMG_1688

My biggest problem with using this food mill is that it is designed to clamp to a counter top. Our home, however, was not designed with this kind of equipment in mind. The clamps will not fit over the lip on our countertops. In order to use this food mill I have to clear off this stand alone shelf that normally houses my food processor, nutri-bullet, and most of my stoneware baking dishes and move it to a location where I can clamp the food mill onto it and be able to crank the handle. I also have to set a chair next to the shelf to hold the pot that the juice runs into. Rearranging all this furniture can be a pain in the you-know-what so I usually only use this food mill if I am making a big batch. Once the food mill is set up the process goes pretty quickly. I just wash the tomatoes, remove the core and cut them up. I put the cut up tomatoes into the hopper and turn the crank and the food mill separates the juice and pulp from the skin and seeds.

I am certain that there are other methods that could achieve the same results and depending on the equipment that you have available you will figure out what works best for you.

Once your tomatoes are turned into juice it is time to cook the juice into sauce. You will be cooking the water out of it. I bring the juice to a boil then let it cook uncovered over a medium or medium-high heat until it is reduced by approximately 2/3rds to 3/4ths as the sauce gets thinker it may be necessary to reduce the heat even more to prevent scorching. Depending on how much juice you are reducing this cooking will take anywhere from several hours to a whole day. Since smaller amounts take less time to cook it may be wise to split a large batch into smaller pots to reduce the cooking time.

While the sauce is cooking I stir it occasionally, as it gets thicker I stir it more often to make sure it does not scorch. When it gets to the point where about 1/3 of the amount I started with remains in the pan I reduce the heat and I start watching it more closely. When the sauce is cooking for a while without being stirred the water will rise to the top, if the layer of water covers the entire top of the sauce I keep cooking. If less than 50% of the sauce has a thin layer of water on it the sauce is probably thick enough for me.

How thick the sauce should be is really about personal preference and how the sauce will be used. For instance if the sauce will be used in a pasta or rice dish where it is mixed in and the water can be absorbed into the rice or pasta a thinner sauce might be appropriate, but if the sauce will be put on top of pasta the remaining water will drain through the pasta and run off the plate, so a thicker sauce is what you want.

I hope that you find this post useful if you intend on making your own tomato sauce. If you have any questions, comments or suggestions please leave them in the comments section on this page, and if you like what you have read please feel free to share it.


Find Our Michigan Grown Garlic

We are thrilled to announce that you can now purchase our Michigan grown garlic at Vinckier Foods in Armada, Michigan  http://www.vinckierfoods.com/contact-armada.php  and Fronney’s Foods in Capac, Michigan http://www.fronneysfoods.com/

You can also purchase our garlic at:

Neiman’s Family Market in Saint Clair, Michigan. http://www.neimansfamilymarket.com/neimans/stclair.jsp

Nino Salvaggio Saint Clair Shores, Michigan location

Water To Go In Richmond, Michigan

Pure Michigan Country Market on 10th Street in Port Huron, Michigan

If you shop at any of these retailers please be sure to thank them for supporting local farmers while bringing you quality products. Your words will be appreciated.


Our First Apple Crop

This has truly been a wacky year for food production at the farm. Some things that normally grow in abundance have floundered and some things that have never produced before have done well. Apples were among the crops that did relatively well this year.

We have seven young apple trees of various varieties that we have planted in the past six years, three of which we planted in April of 2011 before we even closed on the property. Each year the apple trees have had had at least some blossoms in the spring but they never developed into more than a few apples. Last fall, as an experiment, I put a small amount of wood ash around the base of three of the trees. This spring nearly all of the trees blossomed heavily so I am not certain how much effect the wood ash had.

In May, when the apple trees were in full bloom, we had several mornings of heavy frost. Since the frost damaged asparagus, rhubarb and grape leaves, I am still stumped that our apple trees were unaffected.

Our honey bees were more that happy to do their part in our apple production, flying from blossom to blossom and tree to tree collecting pollen from one blossom and redistributing a portion of it on the next blossom while they collected their pollen from that one.

IMG_2573
Honey bee – too busy to pose for a picture

Being our first apple crop we didn’t know what to expect and it seems that our apples fell victim to bugs, worms and disease.  Then to add insult to injury the crows  decided to make our apples part of their diet.

A couple weeks ago when my husband was tired of watching our apples being destroyed he decided to pick what might still be good before the crows got anymore. He first brought home a bag of red apples and since I was busy that day, probably cleaning garlic, I put them in the refrigerator and half forgot about them. A couple days later he brought home these golden delicious.

IMG_3223

He had been talking about dehydrating apples or making apple chips for a few weeks so I decided to use the useable part of these apple to make chips.

When I peeled the apples I was pleasantly surprised to see that the blemishes, which I have not positively identified but might be apple scab, were only skin deep. Once I removed the peel there was no evidence of disease.

IMG_3225

I peeled, cored and sliced the apples. I placed the slices in a single layer on my dehydrator trays. Each tray held about four apples.

IMG_3227

I filled up all nine trays and realized I had peeled way too many apples. So I needed to come up with a semi-quick or easy way to use the other half of those apples. Since fruit pies are a favorite dessert here and pie filling freezes well I decided to make apple pie filling.

I know that golden delicious apples are not necessarily a cooking apple so I was happy to find a recipe for pie filling that just called for apples instead of “cooking apples” or a specific variety of apples. Not that it would have mattered because I often change up recipes, substituting what I have on hand for what is called for in the recipe. Sometimes it turns out really well and sometimes not so good. The apple pie filling is in the freezer for now but I am certain that we will enjoy the apple pie that it makes.

The apple chips on the other hand are disappearing quickly. They make a nice snack.

IMG_3233

When I took them out of the dehydrator, after about 18 hours, I packaged each tray of apple chips in a sealable plastic sandwich bag. This way I know that the package contains about four apples or four servings. Then I put the bags in jars for storage. It is important to know an approximate serving size because these apple chips are so good that it could be easy to get carried away and eat way too many. I warned my husband that eating a whole bag at one time was not a good idea, and that you need to make sure you drink enough water when eating dried fruit. He told me that this was a lesson he learned as a kid – the hard way.

A few days ago when I was looking for a side dish to go with the stuffed green peppers I made for dinner, I came across the “half forgotten” bag of apples in the refrigerator.

IMG_3293
Stuffed Peppers

I decided to cook up some apple sauce. I didn’t need a recipe for this because I have cooked and canned apple sauce many times in the past. Although many of these apples had bites taken out of them (crows) and a few had worms in them, I was able to cut away enough of the bad parts and cook up a wonderful dish of apple sauce. To make apple sauce, after I peeled, cored and cut away any bad parts, I put the apples in a pan with a small amount of water. I brought it to a boil then turned it to low and let it simmer until the apples were very soft. I then mashed the apples with a potato masher. I then continue to let is simmer and thicken up a little. There was no need to add sweetener. I put it in a bowl and chilled it before dinner and it made the perfect side dish.

Over the next few months we will be researching natural options for controlling disease and insects on the apple trees with hopes of growing even better crops in the future, and who knows we might even build a scarecrow or two. https://www.todayshomeowner.com/scarecrows-in-the-garden/

Buying Our Garlic

We are excited to announce that Neiman’s Family Market in Saint Clair is now carrying our Michigan grown garlic. If you are not familiar with Neiman’s you can find them here. http://www.neimansfamilymarket.com/neimans/stclair.jsp

You can also purchase our garlic at:

Nino Salvaggio’s  Saint Clair Shores, Michigan location

Water To Go in Richmond, Michigan

Pure Michigan Country Market on 10th Street in Port Huron, Michigan

If you shop at any of these retailers please be sure to thank them for supporting local farmers while bringing you quality products. Your words will be appreciated.


A Year In Growing Garlic Part X

We are wrapping up 2016-2017 garlic season and at the same time preparing for the next planting so this will be my final post in this series. I’ll start where I left off. We began harvesting garlic in mid July and although we had stopped watering the garlic two weeks prior to that, as is recommended, the soil was saturated from the rains that finally came.

Though larger garlic producers may have other methods, harvesting garlic for us means digging each individual bulb by hand. My favorite tool for digging garlic is this shovel with a narrow blade, a short shaft and a D-grip. It is a comfortable height for digging the garlic and the long but narrow blade can get close to each bulb and dig deep enough to loosen the soil under the roots. We bought a second, similar shovel this spring so my husband, who did most of the digging, would have one as well.

IMG_1534

My husband and I started together digging the garlic but before we got our first hundred bulbs out of the ground I needed to shift gears. I began laying the garlic  on racks so that the bulbs were exposed to the air in order for the dirt to dry, while he continued digging.

IMG_3034

When we ran out of room on the racks my husband began tying the garlic in bundles and hanging them from the fence posts. They still had good air exposure this way.

IMG_3035


IMG_3036

and when we needed even more room he set up this system on the trailer hooked to the tractor which he could then park in the shade until we could get to them to brush and bundle them.

IMG_3039

The garlic coming out of the ground this year was very wet as the rains came just when we didn’t want them too. Once the dirt on the bulbs had dried it was time to remove it.

I have discovered that the easiest way to remove the dried dirt clumps from the roots and bulbs by hand is to wear garden gloves and just rub it off the bulb and roots. In the past years I would where cotton gloves and usually ended going through a several pair of them, ending up with hole in the right glove and a left glove that was still intact. (Yes I am right handed.) This year we used leather garden gloves and they held up much better.

After we rubbed off all of the dirt that was loose enough to come off we used twine to tie them into bundles of 10-25 bulbs so they could dry or cure. The garlic needs to cure in a dry, area with good air flow and out of direct sunlight for the next three weeks or so. The large bundles were hung from rafters to dry and smaller bundles were dried of shelves.

Since many factors contribute to how quickly the garlic will cure I would check different varieties, when I needed garlic for a meal, to see how they were coming along. To check them I would snip a bulb from its stem, clip the roots and peel it. When the bulb is cured all of the layers of peel inside should be completely dry and papery.

It was about three and a half weeks after we first began digging the garlic that some of the garlic was cured and I started the final cleaning. The finale cleaning prepares the garlic to be sold or stored. It involves clipping the dried leaves and stems as well as the roots. It also involves removing any dirt that still remains.

If you are growing garlic just for personal use there is really no hurry to do this. In fact leaving the stems and roots intact and even a little dirt on the bulbs, right up to the time you want to use it, will probably prolong the life of the garlic.

These are the tools I prefer to use for clipping and cleaning.

IMG_3291

On our first day of clipping and cleaning I was blessed to have my sister Jamie, and cousin Abby here to help. Abby is a farmer too and is always eager to help out if I say I need a hand, and while Jamie may not claim the title of farmer, she has done her share of farming related activities. Things such as growing her own vegetables and fruits, raising her own chickens and now she can add cleaning garlic to the list.

Working as a team seems much more efficient than each person doing their own pile of bulbs, so I clipped while Jamie and Abby cleaned. We all gabbed and the time flew by. I was even more grateful when they offered to come back to help one day the following week.

When I refer to clipping I am talking about removing both the leaf end of the garlic and the root end from the bulb. At the leaf end I usually cut 1/4 to 1/2 inch above the top of the bulb being carful not to clip the tips of any of the cloves. On the root end I clip as close to the bulb as possible but some of the roots still remain. It is my understanding that any garlic that is imported into the United States must have the entire root plate removed but garlic that is grown in the US can be sold with roots still attached. I am not sure why this is but since it is easier to just clip the roots down that is what we do.

As for the final cleaning we start by brushing each bulb with the scrub brush. Sometimes this is sufficient to remove the dirt and make the bulb look presentable. Sometimes the outer wrapper is dirt stained and one layer needs to be removed. Our goal is to get the bulb as clean as possible while keeping much of the outer wrapper in tact.

While cleaning the bulb I also give them a quick inspection for quality and sort them by size. To inspect the bulb I feel for firmness. Each outer clove should be firm. I also look for bulbs that may have been accidently sliced or dented while being dug and bulbs that do not have the outer wrapper in tact. Any bulb that does not pass inspection is set aside along with the very small bulbs. These will be used in my kitchen or dehydrated for powder. For sorting by size I am first looking for next years seed. Approximately the largest 15% of this years crop will be saved to replant in October.

Since we don’t punch a time clock I really don’t know how many hours my husband and I put into clipping and cleaning the 5000+ bulbs we grew this year, but I can say it was a long and monotonous process and I am thrilled that it is done.

I hope you have enjoyed following us through this year in growing garlic and if you haven’t been following along but would like to find out what you have missed you can find the whole series here https://donteatitsoap.com/a-year-in-growing-garlic/ . If you have any garlic related questions or comments be sure to leave them in the comments section below and I will be happy to respond.

I will conclude this post by responding to some of the things people have said or asked about growing garlic.

Comment: “Garlic is easy to grow.”

My Response: We have had much success in growing garlic but since I have had many people tell me that they tried growing it without success I am not sure that it is so easy. I do agree that given the right planting time, the right weather and soil conditions and the proper TLC garlic is easy to grow, but this seems as if it could apply to most crops.

I do find that people who make this statement are growing garlic only for personal use, and as a garlic farmer I need to add that while each step in the garlic growing process is easy enough that it could be performed by a 10 or 12 year old, growing 1000’s of garlic bulbs becomes both time and labor intensive.

Comment: I didn’t know that there were different kinds of garlic.

Response: I’ve read that there are as many as 600 different varieties.

Comment: I like the ones with the red coloring.

Response: There are many different varieties that have red or purple coloring on the skin. My varieties may be different then ones you have had before.

Question: “Does garlic really keep vampires away?”

My Response: – “I assume that it does since our farm and home are completely vampire free,” or if garlic is present at the time of questioning I say, “look around, do you see any vampires?”

Additional Statement: “No vampires  were harmed in the growing of this garlic.” I guess I just needed to satisfy any potential readers who belong to Vampire Rights Coalitions and such.

Thanks for reading. 🙂